Showing posts with label clocks. Show all posts

Monday, August 17, 2015

Summer pages plus a card by Agnieszka Bellaidea

Hi!
It's Agnieszka Bellaidea again with several new projects.
First a page about me and time :)
Love this clock from a photo and made my page using the very same color.


For my shiny corners I used acrylic paint in Old Gold by 13arts.


Feather was painted with gesso and just a touch of Old Gold.
Leaves - with Vivid Green also by 13arts.


Second page about somebody much younger.
This beautiful little girl has a strong personality and loves to spend time in her garden.
Her bigger dream is to dance but first she has to be able  to walk.
She is waiting for another operation and her chances are growing!


This time I used mists to paint my corners - Pastel Berry and Light Brown.


These lovely big leaves were painted with a mix of Matt Cocoa and Old Gold.


Now it's time for a card.
For all 3 projects I used papers from different collection by Bo Bunny, love to mix them up.


My dragonfly got his color thanks to acrylic paint in Matte Turquoise by 13arts.


Thank you so much for looking!
Remember, give yourself a chance to win wonderful chipboards by Imaginarium Designs and leave some comments.
Maybe even a suggestion for my next projects? What would you like me to create in October?

Wednesday, April 8, 2015

Step-By-Step Mix and Match Layout Tutorial

Sometimes, when I don't have anything planned for a layout, I will create something totally random. I call these my mix and match layouts, because I have no plans or preconceived ideas on what I want to create. I simply choose a number of techniques and products, and throw them all together. Today, I thought I would show you how this works for me, sharing a step-by-step tutorial on my creative process, for creating a mix and match layout. 

"SHINE"
So, let's get started!


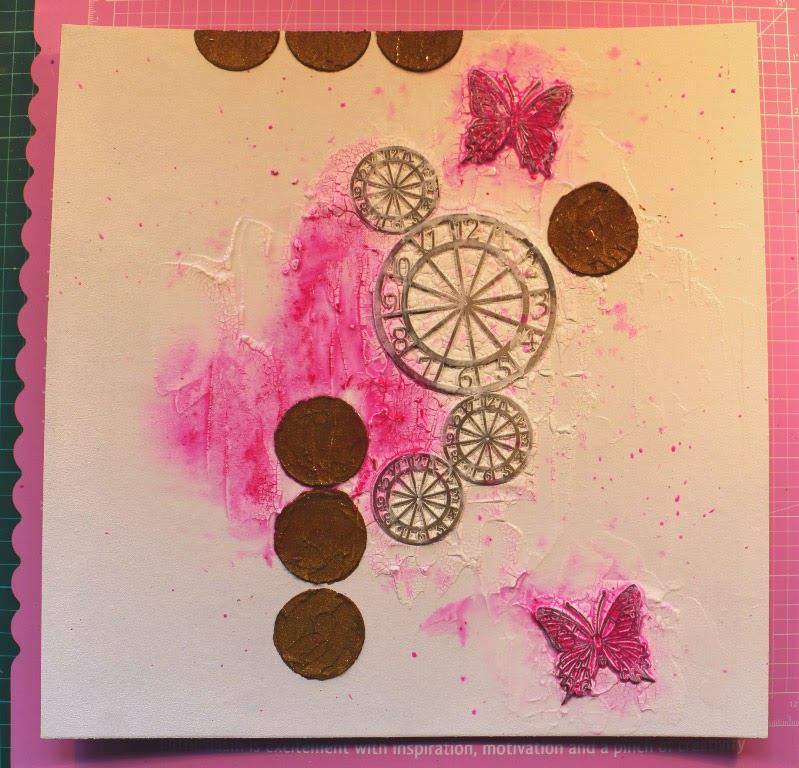
STEP 1: Choose the chipboard shapes you would like to use, and glue them to a 12x12 sheet of chipboard, that has been covered with white gesso. I have used a chipboard background, due to the amount of ink and water that will be sprayed on the layout. I have not painted the chipboard shapes. 


STEP 2: Using a palette knife, cover the shapes thoroughly with Viva Croco Crackling Colour. I have used white, although it is available in a variety of colours. don't worry about being too neat, and the thicker it is, the better the crackling effect. Let it dry THOROUGHLY. 


STEP 3: Using the negative image of the clock faces, place it in random places on your layout, and carefully cover the circle areas with Viva Ferro (in gold). This is similar to a metallic texture paste. Again, let it dry THOROUGHLY, otherwise you will have problems as you add your colour.


STEP 4: Start adding colour. I have a really bad habit of reaching for my spray inks first, when adding colour to a layout. This time, I challenged myself to create my coloured background using something else. So I grabbed my gelatos. And because I felt lazy today, I simply rubbed the gelato directly onto the layout, in the places I wanted colour. 


STEP 5: Spray those coloured areas with water, and using a fan brush, gently mix the colour and water together, flicking splatters of colour as you went. Use as much water as you need.


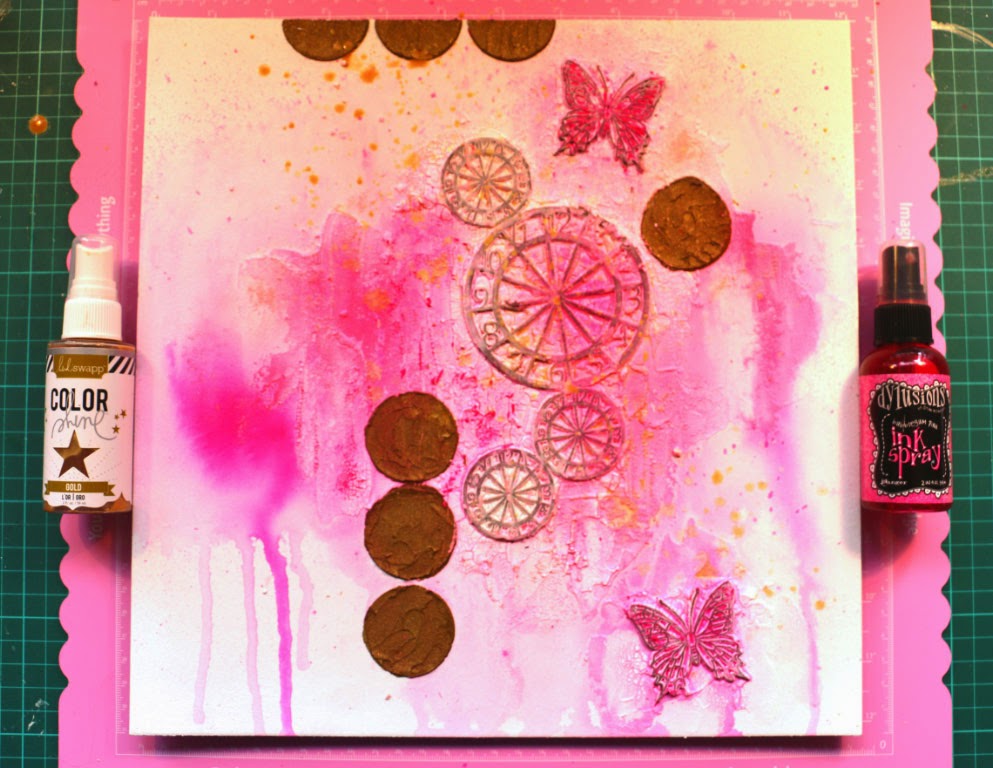
STEP 6: Add even more colour. I have added a light pink gelato shade to the smaller clocks, to the far right and left of the layout, and a little on the larger clock. And because I felt that it still needed more colour, I grabbed the Bubblegum Pink Dylusions spray, and added a couple of squirts, which I also diluted with water. 


STEP 7: It still needs more colour. Add a few more sprays of the Dylusions ink, add lots of water, then gently tilt the chipboard upwards, allowing the mixture to run down the page. 


STEP 8: I decided I needed another colour. So I grapped the Heidi Swapp Colour Shine in Gold, and flicked it all over my page. This helped me to establsh that I would use gold as my main accent colour. It is usually around this point, that I start getting a feel for the layout, and the direction in which it will go. Again, let the layout dry THOROUGHLY, before adding anything further.


STEP 9: Now the layering begins. I grabbed random pieces of vellum with various gold designs, and a project life card, that I had torn into pieces, and started layering them in a random order. I keep moving things around until I am happy with it. I added gold epoxy spots to my butterflies. And I added two photos, both raised with foam tape. 


STEP 10: Here come the flowers. I grabbed a handful of different pink flowers, and added them randonly around the page, until I was happy with the design. I always adhere my flowers with Helmar Liquid Glue Drops as it gives height and dimension, and it also allows me to change my mind and move flowers, as it is slow drying. I added a few white flowers to the centres of the gold circles to create a different visual effect. And I added three gold word stickers to the top right hand side of the layout.


STEP 11: At this point, you will notice that I have removed the three white flowers at the top of the page, and placed them in other positions. For me, I found the white flowers at the top of the page too overwhelming and heavy, and because I had used Helmar Liquid Glue Dots, I still had time to make those changes. I cut out a large gold star from a Project Life card, added foam tape to the back, and adhered it to the page. I have added more gold epoxy dots around the page, and finished by adding glitter around the edge of the star, and lightly over the clock pieces. 


STEP 12: Nearly done. Using Viva Ink, I have rubbed a gold border around the entire edge of the layout. At this point, I step back and take stock. Does it need anything else? This time around I decided it still needed something, so I have added a black border over the gold, and some random journalling.


Here's my finished version. Lots of colour, and lots of sparkle!


Here, you can see the touch of gold glitter on the clock faces.


And doesn't the Vivi Crocko Crackling give such a beautiful effect.


IMAGINARIUM DESIGNS PRODUCTS USED:


Thank-you for joining me today. I hope you have enjoyed my tutorial, and that it may assist you with your  own creative process. 

Don't forget to leave a comment, and a little love, and be automatically entered into our draw to win a prize pack full of Imaginarium Design goodies. 

If you would like to view more of my work, please visit my blog: 

Cheers, xxx :)

Julianne.


Tuesday, August 5, 2014

An Altered Clock and a Love Tag

Hello everyone, and welcome to the ID blog. It's Julianne here, and today I am sharing two projects with you - both created from one set of papers (Webster's Pages Strawberry Fields). 

Let's start with the altered clock. It's amazing what you can find and create for $7. I found this vintage style alarm clock at Kmart and decided it was perfect for an alteration. From a plain black clock, to a unique altered piece of art. And yes, it does actually work - it has to since it's new home is going to be my bedroom. 


I started by pulling the whole clock apart. Using Webster's Pages Strawberry Fields, I covered the clock background in pale blue, added three lines of coloured rhinestones to the outside edge, then layered fussy cut flowers and strawberries around the outer edge. 


Next, I took the large Imaginarium Designs clock face and covered it with black ink, before adding black glitter embossing powder. Once heated and set, I adhered the clock face to the centre of the alarm clock using Helmar's Liquid scrap Dots. 

To finish of the clock face, I added an embossed butterfly (red glitter embossing powder) to the clock minute hand. Yes it works - it goes completely around the face with the butterfly attached. 


The top of the clock needed more height and a background for the flowers, so I embossed an art deco corner with Stampendous Black Embossing Enamel. I love that is such a gorgeous mix of black and gold - so very vintage and aged. I then adhered the art deco corner to the top of the clock with Helmar's 450 Quick-Dry Glue. 


Then the fun part began - adding lots of flowers, vines, trinkets, and little details. I also included a smaller embossed butterfly to balance the large one on the clock minute hand. 


To complete my project I actually painted most of the flowers with Dazzling Diamonds Glimmermist, and then added a Prima pearl flourish down the side of the clock. I actually coloured the pearl flourish with copics to get the desired colour (it was originally pale pink). 

IMAGINARIUM DESIGNS PRODUCTS USED:


 CODE: IDT0014 Four Small Butterflies


CODE: IDS0006 Clock Face 3 inches


CODE: IDC0001 Embellishment 1 (Corners)

Now, I'm not one to waste pretty paper, and after all that fussy cutting for the alarm clock, I had lots of little pieces left over. What's a scrapper to do??? Make a tag, of course!


I started by colouring the tag with red, black and gold mists. To help the tag pop, I inked the edges with balck ink. While the ink was still wet, I randomly, and very lightly, sprinkled on some gold glitter embossing powder around the edge, and set it with the heat gun. Next, I took the large Art Deco frame and embossed it with black embossing enamel, before adhering it to the tag with Helmar Liquid Scrap Dots. 

I then added a large gorgeous red rose to the centre of the art Deco frame. Finally, I took all my fussy cut bits and pieces and randomly tucked them in around the frame and rose.  


Finally, I took the word "LOVE" and covered it with black and gold spray inks, and while still wet, I lightly sprinkled on some gold glitter embossing powder. I added a blast of hot air to set the powder and dry the ink, before adding a dash of glue to the back, and adhering the word to the centre of the rose.

Lastly, I took a gem trinket and attached it to the bottom of the Art Deco frame so that it dangled over the bottom edge of the tag.  

IMAGINARIUM DESIGNS PRODUCTS USED:


CODE: IDW0036 Love Cherish Adore (Small)


CODE: IDD0027 Denise's Art Deco Frame (Large)

Thank-you so much for stopping by and joining me today. I really hope you have enjoyed my projects, and that I have inspired you to save all those little bits and pieces, and to get the most out of your papers.

And don't forget to leave a comment and a little love so that you can automatically be entered into the draw to win an Imaginarium Designs bag of goodies. You never know - you might be our next lucky winner!!! 

If you would like to view more of my work, please visit my blog: JULES THE BLING PRINCESS

Cheers and Hugs, xxx
Julianne. 


Thursday, February 27, 2014

First Post by Romy

Hi Imaginarium fans!

I’m really excited to be posting on the Imaginarium Design blog for the very first time. I’ve had lots of fun working with some Imaginarium chipboard pieces and came up with one lay-out and two tags that I will share with you today. 


First up is a feminine lay-out on which I used three different kinds of Imaginarium chipboard. The Little Treasure title in the left lower bottom is from Imaginarium and I also used the Clock Frame. I actually cut away the inner part of the clock to turn it into a photo frame. I only slightly inked the clock with distress ink ('Walnut Stain') to make it look a little warmer, but still maintain a raw look. I also added some liquid pearls to the inner circle as a nice finishing touch.

Clock Face (4,5 inch)
IDS0005


I also incorporated some mini gears. They always make the perfect little details on every creation!


Besides this lay-out, I also have two tags to share that I made for Inkido. I incorporated some of my favourite chipboard pieces on both tags. 


On my first tag I incorporated a small chipboard frame to make the cluster of embellishments and butterflies stand out a little more. I heat embossed the frame with white embossing powder. 


Swirly Frame 3" x 2"

On my second tag I used a flourish from Imaginarium. Actually it was not a simple flourish, but a corner flourish instead. I simply cut the corner into two pieces to turn it into a long vertical flourish. 


This chipboard flourish was also heat embossed with white embossing powder. I added some pearls to it as a finishing touch.

Thank you so much for stopping by on the blog today!

Don’t forget to leave me a comment on this blog post for a chance to win a package with some gorgeous Imaginarium chippies!


Hugs,
Romy