Showing posts with label vintage. Show all posts

Tuesday, January 16, 2018

It's Time to say Goodbye to Belinda

Another goodbye today for another friend.
Belinda has been on our team for a while and has been  a friend and fellow teacher for even longer. It has been a joy and privilege to know her. We will miss her on our team but wish her all the best for 2018. 
 
 
Belinda again is an all round scrapbooker, she makes amazing cards for Dark Room Door, does stunning project life, art journaling, and pocket letters, to say nothing of her amazing layouts. Of late she has taken up drawing and is now a master at it. Like everything she turns her hand to, it's not long before she is an expert and her work outstanding. 


I had so much fun going back over the blog and choosing my favourite Belinda's layouts. There were so many to choose from but here are a few I really liked. Belinda really is an expert at layering and her page above is an excellent example  of just how good she is at it. 
 

Belinda always surprises me with her work. She even has a dark side which she crosses over to from time to time. Her layout above show this. The layout was one she did on herself. Again her skill at layering is shown here.


This layout is a perfect example of  mixed media and shabby working well together. Belinda is a master of this and I just love this layout.


Again another example of Belinda's mixed media layout with a very cute photo.


This layout was another favourite of mine. Belinda does a lot of her work on kraft backgrounds and this one is a wonderful example of how you can add your own colour to your background to suit your photo. Again her layering on this layout is perfect, with the banners at the bottom giving her a foundation for adding more photos. She also uses our chipboard raw from time to time and I love the look she has achieved by doing this on her layout.

We do wish Belinda all the best with everything she does in 2018 and hope she has a wonderful year.
Please feel free to wish Belinda all the best.
Thanks for looking.

This should be our last farewell, so now we can start welcoming the Design Team for 2018. I can't wait to see what they all come up this this year.
Thanks for looking.
Jane

Monday, November 6, 2017

Moodboard Motivations

This month the design team are working with this deep, rich moodboard 
( source: Pinterest) 


Kelly-ann Oosterbeek is kicking off this post with a layout inspired by all the vintage colours and fob watches found on this moodboard.


Kelly-ann says:
I loved this mood board for inspiration ... in my head Browns/blacks/clocks = vintage.
 I've used a pretty basic background paper for this layout but touched it up with ink and watercolour paints. I also used watercolour paints on all the chipboards and those tufts of grass you can see at the base.


Using watercolour paint can create a beautiful patchy look that mimics age ... here I've painted with brown but used watered down white over that to give a chalky look to the finish.


Water colour paint also has the added bonus of soaking into the chipboard very effectively saving you from having to painstakingly cut in around the edges.


Thanks Kel.

Next we have Sandi Spink with an inspired layout on black.


Sandi says:
I was inspired by a workshop I attended last year held by our wonderful Louise Nelson, the background is a rolled section of white gesso and used a spatula to scrap lines into it whilst wet. I used an antique gold paint to coat the chipboard 'Dress' and Distress Oxide Ranger ink on the 'Now' arrow. The clock/cog piece was covered in Silver Versa ink and then embossed with Tinby Melallic Melts 'Paline'.


Thanks Sandi.


The talented Louise Nelson herself is next...

For the November theme Louise thought outside the box completely! 

Louise has created 3 pairs of fun and funky earrings using her own designs.


 Whilst they wont last forever they will certainly be fun to wear whilst they do.


Louise was inspired by the mood board to use 2 of the colours; black and silver.


FANTASTIC projects girls, thanks for the inspiration.


Friday, November 1, 2013

Its your smile that captures my heart- Girly Goodness

Hi There!

Shell Carman here today with some girly goodness plus a vintage card!

My little Evil Evie recently turned 3. This is a pic of her before her party. She looked totally adorable (& innocent but don't be fooled!!) and she couldn't keep that big cheesy smile off her face! I wanted to put together something bright but girly. I'm spoilt for choice with all the gorgeous girly chippies Imaginarium Designs has!


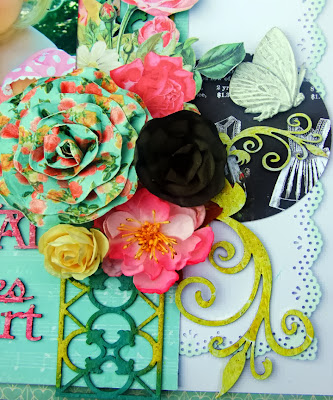
Flourishes are definitely a favourite of mine. I love adding them to flower clusters for extra texture. I first painted them with gesso then used a small paint brush to add some Shimmerz in Sunny

The Embellishment 4 was painted with gesso then I used my fingertip to dab on Shimmerz in Magenta.

The title was also painted with gesso and Magenta Shimmerz. The border was inked with Prima Chalk Fluid Ink in Teal Damask down the centre then inked with Prima chalk fluid ink in Coltsfoot Stemens. I added some Shimmerz Sunny over the top for more texture

Imaginarium Designs Products Used
IDS0013 Embellishment 4
IDB0002 Four circles border
IDP0093 Its your smile Phrase
IDFL001 Flourish 1
IDT001 Flourish 1 Tinies

Other Products
Prima Anna Marie paper
Prima Anna Marie tag
Prima Anna Marie flowers
Manor House Creations flower
Prima Resin Butterfly
gesso
Shimmerz Sunny
Shimmerz Magenta
Prima Chalk Fluid Ink Coltsfoot Stemens
Prima Chalk Fluid Ink Teal Damask
Prima Chalk Fluid Ink Pastel Green
Scrapbook Adhesives by 3L E-Z Runner
Scrapbook Adhesives by 3L 3D Foam Squares White
Scrapbook Adhesives by 3L Dodz 3D

I'm still trying to get ahead with the Xmas card making so here is another one for my stash!
I prefer my Xmas cards & decorations to be more traditional & vintage Graphic 45 12 Days of Christmas is a great traditional collection & blended beautifully with the chippies. I especially love the little reindeer! Too cute!
The tulip flourish was coated with mod podge then dipped in clearsnap glitter. The reindeer was painted with the Tim Holtz dabber in Antique Linen. While the paint was wet I dipped it into some micro beads

I inked the Edward Relief Border with Ranger Distress Ink in Walnut stain then painted a coat of mod podge. While it was wet I sprinkled some copper gold embossing powder & set it with a heat gun. The Happy Christmas title was painted with Tattered Angels Glimmer Glaze in Paradise Pink

IDS0073 Two Reindeer in a board
IDFL0007 Tulip Flourish
IDB0010 Edward Relief Border
IDP0073 Happy Christmas 

Other Products Used
Graphic 45 12 Days of Christmas paper
Spellbinders Shapeabilities Fleur De Lis Motifs
Spelbinders Decorative Labels 28
Kraft paper
Ranger Distress Ink Walnut Stain
Mod Podge
Clearsnap glitter Peridot
Bella Boulevard Micro Beads
Tim Holtz Distress Paint Antique Linen
Tattered Angels Glimmer Glaze Paradise Pink


Don't forget to leave a comment on this post for the chance to win an awesome Chipboard pack!!

Thanks for looking!


Wednesday, May 1, 2013

Happy Days/ 3D Pop up Card

Hi There


Shell Carman here today with a mix of Imaginarium Designs & Graphic 45 goodness!

This first project is a Shabby Chic 3D Pop up card.

This is the inside of the card once fully opened


To alter the Heart Top Picket Fence first paint with gesso. Use Ranger Distress ink in Walnut Stain & gently/ randomly swipe to give a more vintage appearance.


To alter the window with lattice & shutters first paint with gesso. Once dry paint a thick coat of Ranger Distress Crackle paint in Shabby Shutters. Let the paint dry for a few minutes then take a heat gun & hold it close to the paint. This helps the paint to dry & creates the paint to crackle & bubble more!

The outside of the card


Imaginarium Designs Chipboard Used

Heart Top Picket Fence IDB0005

Window with Lattice & Shutters IDS0016

Other Products Used
Graphic 45 Secret Garden papers
Graphic 45 Secret Garden Alphabet Sheet
Prima Flowers
Ranger Distress Ink Wlnut Stain
Ranger Distress Crackle Paint in Shabby Shutters
Gesso
Ribbon
Martha Stewart Punch
lace

After playing with shabby chic pretty colours I wanted to change to some
vintage coppers & browns.
This page is of my baby girl Evie Jools.


The Happy Days Title was a great match for this photo. I first painted the title with gesso then inked the title with versa colour ink in sky blue. Once this was dry I painted a coat of Ranger Distress Crackle Paint in Rock Candy. I use a heat gun to help crackle the paint.Once completely dry I randomly inked some Ranger Distress ink in Walnut Stain so that the brown ink went into the cracks of the paint.

I cut this Vine Flourish in half & placed half on either side of the flower cluster. To alter it paint a top coat of gesso. Once dry use your finger to dab Imapsto on the leaves. Pain a thick coat of Shimmerz in Spiced Copper over the entire flourish. While it is still wet sprinkle some Copper Embossing powder randomly on flourish. Use a heat gun to set embossing powder.

By using a mix of the Impasto, Shimmerz & Embossing Powder it creates lots of texture to the chipboard


I kept the clock & compass simple first painting with gesso. Then using versa colour ink in Ash Rose I inked the entire clock. i cut the clock in half & placed half  on either side of the page

Imaginarium Designs Products Used


IDFL0004 Vine Flourish

IDP0069 Happy Days Phrase

IDS0062 Clock & Compass

Other Products Used
Graphic 45 A Ladies Diary papers
Bo Bunny Paper Doilies
Prima Flowers
Ranger Distress Ink Walnut Stain
Versa Colour Ink Ash Rose
Versa Colour Ink Sky Blue
Ranger Distress Crackle Paint Rock Candy
Impasto
Shimmerz Spiced Copper
Embossing Powder Copper

Thanks for joining me this month for Imaginarium Designs. To see more of my creations, you can head over to my blog here.  Don't forget that further inspiration by others, as well as the Design Team, can be found on the Imaginarium Designs Ning Site too!

 Also, don't forget to leave a comment on this post, to be in the monthly draw to win a package of Imaginarium Designs chipboard.

Cheers Shell XX

Friday, March 1, 2013

Oh Boy!

Hi There!


Shell here with you today with a mix of Vintage & Grunge pages.

This first page is of my spunky little Man Hunter. He was dressed up ready to go to his first ever Disco at school last year. This photo makes me smile when I remember how adorable he was getting ready. He tried on so many clothes until he decided on his shirt & shorts. Then he asked me to re iron his shirt because he felt I didn't do a good enough job the first time round LOL!


 To give the Our Boy title a grungy look first prime it with gesso. Then paint some Tattered Angels Glimmer Glaze in Oil Slick. Once dry paint a coat of Ranger Distress Crackle Paint in Rock Candy. Let it dry naturally to start with but then take your heat gun to it & get up nice & close so that the Distress Paint crackles & bubbles. Once the Distress Crackle Paint is dry gently use some sand paper or an emery board to sand the title. Don't take too much of the colour off though. Finish off my using some Prima chalk fluid ink in & randomly ink around the title. I then used some Prima metal gears to decorate
 To alter the oval bracket I simply painted a coat of Tattered Angels Glimmer Glaze in Oil Slick. This gives a nice sheen to the chipboard

To alter the chicken wire paint a coat of Brown acrylic paint.After I had stuck down the chicken wire on my page I then randomly painted some Modge Podge then sprinkled some copper embossing powder on top. Use a heat Gun to set the embossing powder

Imaginarium Designs Products Used


Honeycomb 6X6- IDS0054


Our Boy Phrase-IDP0006


Tinies Oval Frames(3 per board)- IDT0002

Other Products Used
Kaisercraft 75Cents paper - Penny
Kaisercraft 75 Cents paper- Sovereign
Kaisercraft 75 Cents paper- Pound
Kaisercraft 75 Cents Collectables
Kaisercraft Paper Blooms Sage
Prima Engraver Newsprint Mini Frames
Prima Engraver Roses
Prima Engraver Mini Roses
Prima Engraver Daisies
Prima Junkyard Findings Typo Mini Bulb
Prima Junkyard Findings Gears
Ribbon
Tattered Angels Glimmer Glaze oil Slick
Ranger Ditress Crackle Paint Rock Candy
Prima Chalk Fluid Ink
Gesso
Brown Acrylic paint
Copper Embossing Powder

I went with a traditional Vintage vibe with this next page. This photo is one of my favs as it is one of the few photos I have where all 3 of them were co-operating! I decided to print it in Sepia to follow through the Vintage feel


I love this Special Memories title. The font is so pretty. I first primed with gesso then when dry I painted a thick coat of Ranger Distress Crackle Paint in Scattered Straw. Once dry randomly ink with Distress Ink in Walnut Stain to achieve an aged look.


I wanted to add some blue to my embellishments so I kept this flourish simple. Prime with gesso then paint a coat of Shimmerz in Sky Blue.

This border has a gorgeous Victorian era feel to it. It brings a lovely elegant look to the page. Prime with gesso the paint a coat of Shimmerz Blingz in Spiced Cider. Add some Liquid Pearls in Bisque to decorate

Imaginarium Designs Products Used


James Border- IDB0009

Special Memories Phrase- IDP0008

Jessica Flourishes (2) - IDFL0014

Other Products Used
My Creative Scrapbook Limited Edition January Kit
Basic Grey Lucille Kitten Heels
Basic Grey Lucille Gather
Basic Grey Lucille Pleat
Kaisercraft Forget Me Not Queen Bee
Prima Flowers
Craft Flowers
Lace


Prima Flowers
Kaisercraft 75Cents Collectables
Kaisercraft Mini Blooms Iceburg
Paper Doilies
Shimmerz Blingz Spiced Cider
Shimmerz Sky Blue
Ranger Distress Crackle Paint Scattered Straw
Gesso
Ranger Distress Ink Walnut Stain
Ranger Liquid Pearls Bisque

That is it for me for this month for Imaginarium Designs. To see more of my creations, you can head over to my blog here.  Don't forget that further inspiration by others, as well as the Design Team, can be found on the Imaginarium Designs Ning Site too!

 Also, don't forget to leave a comment on this post, to be in the monthly draw to win a package of Imaginarium Designs chipboard.

Thanks For Looking!
Cheers