Showing posts with label flourishes. Show all posts

Monday, February 5, 2018

Favourite Holiday Photos - with Tracey Fowler

Hi Everyone,

It is fantastic to be back here at Imaginarium Designs sharing with you my projects and also to be creating again. I don't get much of a chance to spend time in my craft room over the summer school holiday break so it was nice to spend some time in their creating this week while the boys started back at school.

"Down By The Sea"


It only seemed fit to create a Summer themed layout since we have just finished the school/summer holidays. My younger son has a love of the beach, especially the waves!

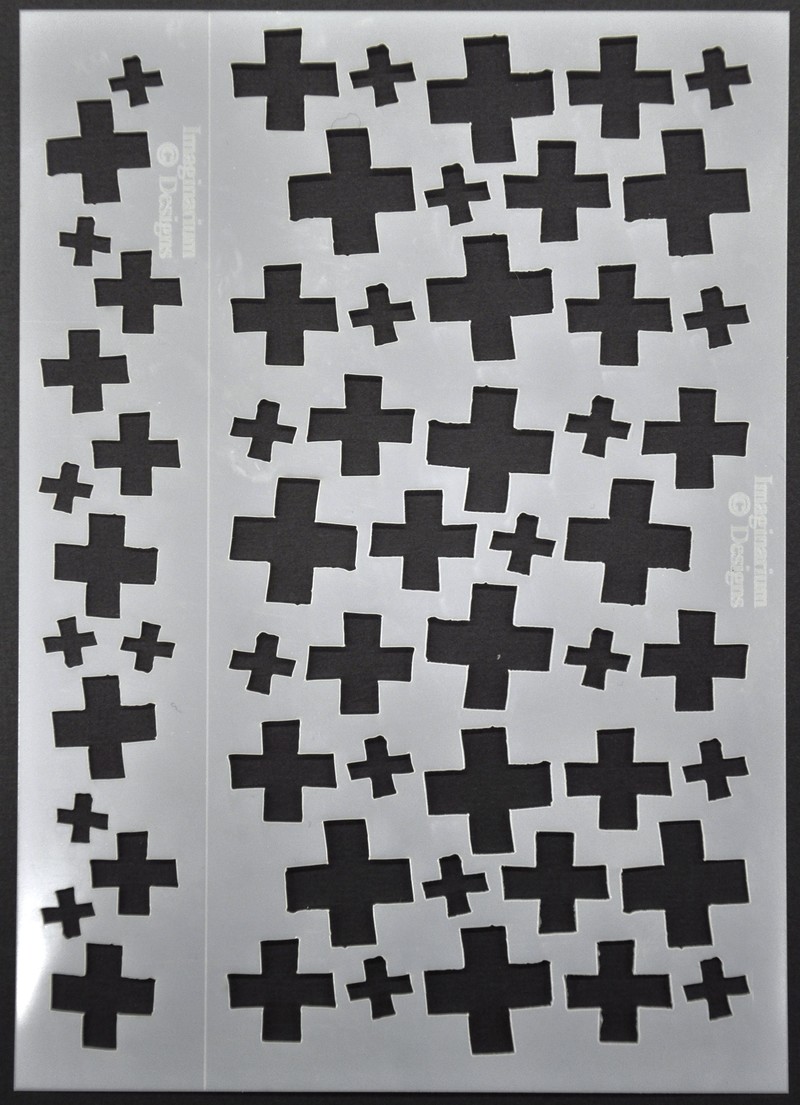
To create this layout I chose a paper range that had blues, greens and hint of purple. I have used the Imaginarium Designs stencil Crosses Stencil IDMM006 and white crackle texture paste. Once this dried I used a teal blue spray to add colour into the cracks of the crackle paste. I have also used flicks of gold, gun metal spray along with adding random texture stamp using a black ink.


For the Imaginarium Designs title Down by the Sea, I have used a metallic black embossing powder. I liked how this embossing powder has some shimmer and sparkle which reminds me of the ocean.


I have heat embossed the Chevron Boarder IDB016, using an aged white with flecks of gold. I have then used a patina effect paints to give the chipboard a metal/rusty look. I have cut the Chevron Boarder IDB016 into pieces and placed it on my layout.


I have created a cluster using pieces of metal and flowers. I have used the patina effect paints to bring all the elements together to create a unified look.


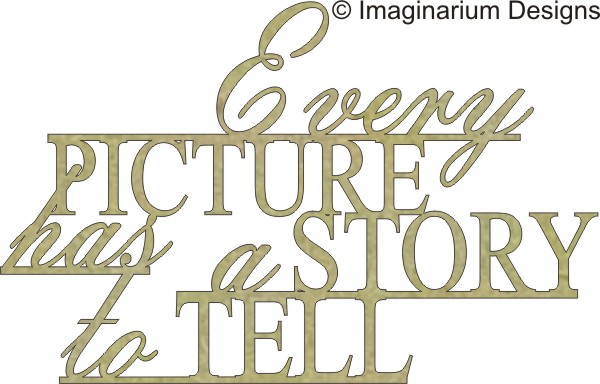
"Every Picture has a Story to Tell"


This layout I have used a photo of one of our most treasured family holidays. Yes it was summer time here in Australia, but while everyone was sunning themselves, we were rugged up in  Finland. 
I placed layers of tags, corrugated cardboard, tissue paper, vellum and die cuts under the photo.


For the ID Chipboard Title  Every Picture has a Story to Tell, have coloured it using a black stamp pad. I didn't want a raised or shiny finish on the title, I wanted it simply black.


 I have used a white embossing powder on this gorgeous  ID chipboard Flourish.


To complete the flower cluster I used Loolabelle's Cherry Blossom (3 in a board) IDD0068 and coloured them using a rose colour ink pad. 


Here is a picture of all the ID Chipboard that I used for my projects


Thanks for stopping by and looking at my projects. I am really excited about this upcoming year and sharing with you my creations.


Wednesday, September 13, 2017

Wonderful Wednesday with Alison Bevis

Hello!!
 and Welcome to my September blog post - 
tentatively titled,
Wonderful Wednesday!!
Well, okay I obviously couldn't think of something better so kept it - 
as Wednesday are a wonderful...

I was going to make Christmas cards, bought some beautiful red papers,
had some fabulous chipboard pieces ready and then...
I was at a scrapbook store and saw a small paper pad with lovely images and soft colours, so
here you have the cards created from those papers with just a little chipboard - 

I can never have too many CARDS
 - it's always handy to have a variety ready at short notice!!

No automatic alt text available.

they are all very simple,
Inked chipboard to add some colour

No automatic alt text available.

this title inked with Oxides and then sprinkled with water - love that effect!

Image may contain: 1 person, text

The paper was so lovely I just added a chipboard frame for the sentiment -

Image may contain: outdoor

...and a little camera!

No automatic alt text available.

How lovely are these little frames on cards - such a good size!!

No automatic alt text available.

The frames hold a little flower perfectly on a bed of crackle medium - 

No automatic alt text available.

A little bonus stamping for the background

No automatic alt text available.

Do you love Oxides for colouring chipboard?
It just looks so good!!

No automatic alt text available.

I was loving these funny photos,
so did a bit of scrapping too!

The Great Escape... from reality?

Image may contain: 6 people, people smiling

Take 2 silly photos
2 beautiful daughters,
add a doiley, or two, 
a couple of handmade embellishments (Thanks Shaneen)

Image may contain: 1 person

a sprinkling of blooms
and

Image may contain: plant and flower

some beautiful flourish chipboard pieces to go with the title
- done!!

I recently visited SENZ in New Zealand, while I was there my friend Melissa and I had a little adventure on Sunday morning, we had a civilised coffee and cake in Centrepoint - 
we enjoyed the 360' views of Auckland and,
then there was an opportunity for some photos with an optical illusion,
of course Melissa had to get a funny photo...
and I documented the 'green screen' action - 

Image may contain: 1 person, smiling

I even included a squashed penny we rolled while we were there as a memento!!


Rufus Embellishments                    Leah Frame


Chevron Border                   Forever and Always

Chipboard is so easy to include on any papercrafting projects,
what piece will you choose for your next project?

Perhaps next month I'll get those Christmas cards completed?
Hope you'll come back to check...

Thank you for visiting,
Alison xx


Sunday, June 4, 2017

June Projects with Belinda Spencer

Hi everyone!

Belinda here with you today to share a layout and a card I have created using some fabulous Imaginarium Designs chipboard.

'Beautiful You' Layout


So this layout is my take on the current June challenge at Kraft Plus featuring kraft cardstock plus ONE colour (a touch of white was allowed). I chose RED to match the photo of my daughter in her Christmas outfit.


I had the idea that I wanted to add all of my chipboard pieces to my layout before I added the colour so that's what I did. I glued the frame, butterfly and flourish on before spritzing my layout with water followed by Red Kaisermist and a bit more water.

I dried it all off with a heat gun and then decided that the colour had soaked in to the chipboard a bit too much and wasn't nearly bright enough for my liking. So I grabbed a red Gelato and added some more vibrant colour. I blended it with my finger, spritzed on a little water and blended a bit more.


I coloured the heart and the title with the Gelato too before layering everything else ontop of the chipboard. I love the way it turned out and think I might make a whole rainbow of layouts using this colour stained technique.

Here's what I used:

IDS0059 Monarch Butterfly


IDFL0030 Merrilee Flourish


IDD0053 Loolabelle's Frame


IDW0072 Beautiful Delightful Wonderful


Next up I have a card that I created for my daughter's recent birthday. Twelve!!!! She turned TWELVE!! I'm not sure that has really sunk in yet. 

'12' Card


This was a really quick and easy card to put together using some co-ordinating patterned papers and embellishments. I wanted to frame the balloon and the brand new chipboard frame was the perfect fit.


I heat set the frame and the star burst with a gold tinsel embossing powder for some added sparkle to the card.


I covered the numbers with matching patterned paper and sanded the edges just until they were smooth.

Here's what I used:

IDD0054 Loolabelle's Star Bursts


IDN0001 Numbers

Thanks for stopping by today to check out my projects. I hope you will pop back tomorrow to see the loveliest of creations by Miriam.

Cheers
Belinda