Showing posts with label Heather. Show all posts

Tuesday, May 1, 2012

Three lovely Layouts to share

Hello Everyone,
Boy have we all be busy, so sorry for not posting for a few days,  now I need to catch up. Today I am sharing some layouts from the design team featuring masking and our chipboard.  The Girls are so talented and come up with the most amazing ways to use our chipboard.
First up is Hilde. She has called her layout "Fun Day" and the photo certinly shows two lovely little ladiest having a fun day together.

Hilde has used one of our chipboards as a mask. She used our clock without hands and a kerri flourish as a mask. She used Tattered Angles Glimmermist to spray the chipboard and the page.


IDS0017 Clock Face without Hands


IDALC0001 Lower case Letters

IDFL0010 Kerri Flourish (Large)

Hilde does lovely layouts and this one is so pretty. I always love seeing what she comes up with.
Materials Used
Paper are from My Minds Eye.
Flowers - Webster's Pages and Marianne Design.
Tattered Angels Glimmermist.
To see more of Hilde's work visit her blog

Next up is a layout from Heather. She has also used a mask on her layout from Crafters Workshop.

Heather used the large flowers only from our Flowers & Birds. She twisted green woollen thread around the stems to bind them together. The stems are left raw and the flowers are inked with "brick" Versa colour ink. For her title she used some of our Alpha's which Heather inked with the Versa colour ink pad and applyed Utee over the top to create the shiny finish.

IDS0026 Flowers and Birds
I love Heathers work and have been a fan for quite a few years now, in fact a Heather project was the first class I did at my local scrapbooking store about 7 years ago. (it is still not finished!)
other items used
Kraft paper
Papermania Docraft portabella paper
Prima --  Printery Collection
Versa Color --- brick
crafters workshop mask .. chicken wire
tags .. Bumble bee tags
green embroidery wool
To see more of Heathers work, visit her blog

 To finish of today's post I have a layout from Lady Grace. She has called it Beautiful and it certainly is just that.


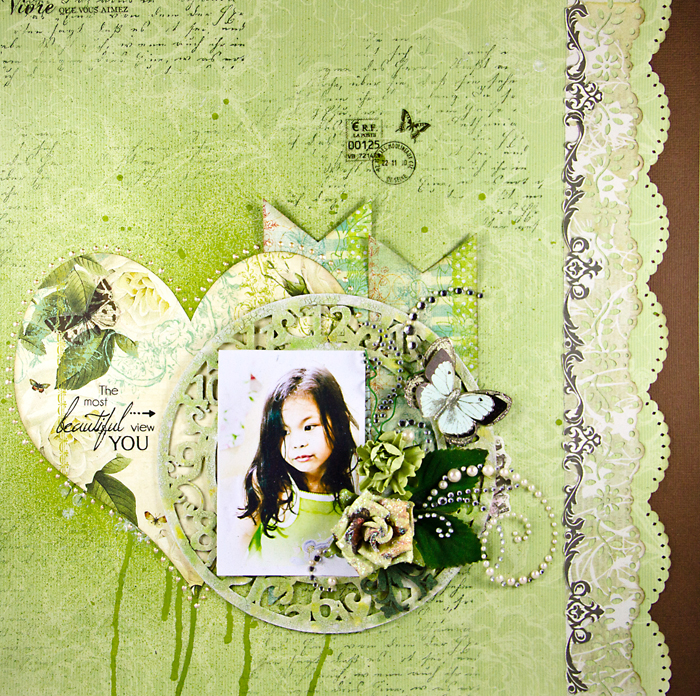
Here is what Lady Grace had to say about her layout.
"For this layout, I have used Clock face without hands as my base matting of my daughter’s photo. I used the large clock to draw the eyes of the viewer to the photo, making that part the focal point of my design.

"The clock was initially painted with white gesso. Once it dried, I applied thick coating of crackle paint to achieve the cracks I wanted. I immediately misted a few greens and yellow on it while it was still wet to add colour. I also allowed some part of the coating to fall out to get the look that I wanted".
Products Used:  Kaisercraft patterned papers, flower and embellishments, Webster Pages diecut paper,  Bazzill Cardstock, Gesso acrylic paint, Hero Arts and Ideaology stamps,  Shimmerz Mist,  Ranger Crackle Paint, Prima flowers and bling flourish.

I love the way Lady Grace has layered all the pieces on her layout and the clever way she has decorated her chipboard.  To see more of Lady Grace's work visit her blog
Hope you enjoy todays three layouts, they are quite different but all are so pretty and cleverly done with lots of ideas. Don't forget to leave a comment and go into the draw to win some chipboard.
thanks for looking
Jane

Thursday, April 19, 2012

Three different Layouts, three different looks

Today I have some more layouts to share with you all if you are needing some more inspiration.
First Heather has a lovely layout for you. Her layout looks simple but she has done quite a bit to her cardstock before she even started working on her layout.


Heather has used a mask with ink to give the chicken wire look to her layout.

IDP0036 Wishing You Happiness

Heather has this tip to share "I cut the branches in two and used each piece separately on the page ...one section is attached to the top right corner and the other is layered with the twigs"
 Heather always uses stamps on her work and always does some pen lines. Heather inked all her chipboard with Raspberry Versa color ink.


IDFL0013 Twig (2 on a Board)

Heather's handy tip...
Most of the chipboard can be cut into sections and used creatively as I have demonstrated on this page ... experiment with your pieces and you will be amazed how versatile these chippies are .

other items
white bazzill card
kraft card
Raspberry Versa color ink
Crafters workshop mask
Velvet flowers – Megs Garden
bumble tags
stamp by MAGENTA  made in Canada
What a lovely layout from Heather, thanks so much for sharing with your page with us. To see more of Heather's work, visit her blog.

The next Layout is one from Adriana. I love the photo she has chosen and how she has worked her page around it. There is a lot to look at on this wonderful page.


Adriana's layouts always look lovely, with lots of little bits and pieces to take in. She has done some punching along one edge of her page. I love the finish on her chipboard, she has inked it and added some glossy accents to make it shiny.


IDFR0003 Swirly Frames 6x4 inches


IDAUC0001 Capital letters

I love the way Adriana has layered her chipboard title on top of each other. She has used the alpha's and layered a word on top. Again she has inked them and added glossy accents.
Once again a lovely layout from Adriana. To see more of her work visit her blog.
The last layout is from Me. This is one I did for Graphic 45. I have a tutorial on my blog for making this layout if you want to have a go.

It is a page I did on my son. He traveled with me to the USA early this year. We spent a day at Disney Land and we went on the "mad hatter ride"  Josh worked out that if you turned the wheel faster the cup span faster. He had great delight in turning the wheel as fast as he could and watching me turn green. I love the way the photo has captured the movement of ride in the back ground. I painted a clock black and layered another title cream and glued them on top of each other.


IDS0006 Clock face (3 Inch)


I used papers from Graphic 45's olde Curiosity shoppe. I used 3L adhesive tape runner and foam tape. I also used 3L black photo corners. I love these and I used them by the packet full.
I have a thing about clocks, I used them on lots of my projects.
To see the tutorial on making my layout then visit my blog
That's it for today, please leave a comment and go into the draw to win some chipboard.
Have a great weekend
Jane


Wednesday, March 28, 2012

Delicate and Dainty

I love Vintage and as soon as I saw Sandie's work I knew she was an expert at it. 
I love her style, it's delicate and dainty vintage and I am a big fan. 
Just look at this lovely card, it is so old worldly and pretty.
I am always impressed by what she does. Here is what she said about her card.
Love Card
I used the ‘Floruish 1 and Variations’ (IDT0003) to create interest in the flower arrangement of the ‘Love’ card – some of the flourishes were cut into smaller portions to fit the arrangement.  


IDT0003 Flourish 1 and Variations

IDW0036 Love Cherish Adore (Small)

Each portion, including the ‘Love, Adore and Cherish Small’ (IDW0036), and ‘Bird Cage’ (IDT0019) were painted using Creative Inspiration paint.Firstly, I painted with ‘TuTu Pink’, and then a light brush of ‘Gold’ to tone the pink down to fit the card style.Using a dauber to apply the ‘Gold’ gave a variegated appearance upon each of the chipboard pieces, which can be seen in the close up photographs. 


IDT0019 4 Bird Cages on a Board.
Imaginarium Designs:
Flourish 1 and Variations (IDT0003),
Love, Adore and Cherish Small (IDW0036),
Bird Cage Small (IDT0019)
Paints: Creative Inspiration Paint, ‘TuTu Pink’ and ‘Antique Gold’
Craft Supply: Misc Ribbon for hand-rolled roses, Satin ribbon for leaves, Gold Bird, Butterfly Charms, Chain, Shimmer Paper (no brand), and image from personal collection
Ranger: Glossy Accents
Dies: Cheery Lynn Designs, ‘Olive Leaves’, Oval Classic and Scalloped Stacker Series
Cardstock” Bazzill
Adhesive: X-Press It Double Sided Tape, Memory Book Glue Dots, and Foam Squares

To see more of Sandie's work visit her blog

Next is a Tag and Envelope from Heather. Heather is the Queen of making this kind of project. She excels at them and I love this one.
.
the chipboard is inked with Versa color/ raspberry then black ink added lightly on the edges .

Just look at the detail Heather has added to her project. It is so classy, wouldn't you love to receive a card like this!

Materiasl used
Black Cardstock
Black cotton
Basic Grey Paper
College Press Print Paper
 Tim Holtz/Tissue Tape
Kaiser Sparklets
To see more of Heathers work visit her blog.
Thanks Sandie and Heather for sharing two beautiful projects with us today. More to share on Friday!

Saturday, March 17, 2012

It's got to be Vintage with Heather and Natalie

I love vintage and Heather is so good that it. 
She has a huge following on her blog and it is not hard to see why. 

Here she has made a mini book or booklet. 
I love the way she layers everything and her projects always have lots of little bits and pieces for you to look at.

Above you can see all the detail Heather has layered on the front of this booklet. 
So much to see, it's like a "where's wally". The closer you look the more you find and this is the cover, 
What awaits us inside?

Just look at this, it is amazing, folded paper, cut out images, inked chipboard, buttons, lots of fussy cutting and even a tag. So much attention to detail, but you expect that from Heather this is what she excels at and why I admire her work so much.

This photo show the detail even better. Just look at all those bits and pieces. 
Heather inked the chipboard shapes with  Tim Holtz distress ink - Rusty Hinge then dabbed it with a versa colour ink pad - Celadon. The cogs are layered and secured with brads. The heart is covered with paper first, cogs are then added to create dimension and interest. Heather has excelled herself with this project and I am delighted to be sharing this with you.


IDT0025 Mini Mannequins and Hoop in board (tiny)

GRAPHIC 45 TAG/CARD
items used
Graphic 45 paper/ole curiosity collection
black cardstock
Tim Holtz tissue tape /key/rusty hinge ink
Versa color ink/ Celadon
Kaiser sparklets
brads /black cotton
Imaginarium Designs Chipboard
heart
IDT0025 Mini Manequins and Hoop
IDT0004 Mini Cogs
Flower design by Louise
Title /beautiful 
If you would like to see more of Heather's work, visit her blog
Heather Jacob


Also today we have this layout from Natalie.


For a recent challenge over at Once Upon A Sketch, the Design Team had to create a page about someone who they miss.

Natalie created a tribute to her late Uncle Geoff who passed away in 2009.
Uncle Geoff transported Yachts for a living and was a man of the sea ... the simplicity and design of this page are perfect for his tribute.

All of the ID chipboard elements have been inked in black and then painted with paint to get a slightly rough, masculine feel to them. The addition of the yacht charm to the tinies clock sets it off really well.


Materials
ID corners
ID alphas
ID tinies clock
Teresa Collins paper
The Crafter Workshop template

Fiskars punch

If you would like to see more of Natalie's work, visit her blog

Thanks ladies for sharing such beautiful projects!


Have a great weekend!

Sunday, February 5, 2012

Heather .....

Hello Hello
Are you enjoying what our fabulous Design Team have to offer?
I know that I sure am!

Today I share some work by Heather .......

This is what Heather had to say....
"To begin the year with ID, I decided to create a masculine page and a feminine page, just to demonstrate the versatility of “ Imaginarium designs” chippies
 
The Masculine Page  
“YOU”

I have created a slightly grungy page and on the chippies I have used three colored inks to tone in with the papers.....
First I inked with Rusty Hinge Distress Ink (Tim Holtz) then added some charcoal (Kaiser) and finished off with Brick (versa color)
The secret to this effect I find is to be quite random and quick with the inks ... not too deliberate or fussy .
when layering the cogs .. I kept turning them in different directions until I was happy .. then secured them with a brad ...
These cogs are one of my faves for boy pages ... love them .


The Feminine Page.. 
“ Moments in Time”
 
 
"My Ella is such a feminine little girl .. so I have used lots of flowers with the chipboard.
All the chippies are inked with (Versa color) Raspberry  and Aubergine ( Kaiser) you may have to look closely at the images to see the subtle difference in the shades on the leaves and flourish .
The trick I have used here is cutting up the flourish and the leaves to add interest.
I arranged the flowers first then added the pieces of flourish and leaves where I wanted them..
The ID chippies are so versatile, as sometimes all I need is a small piece which adds the perfect finishing touch to a page .
The title ( love all the ID titles ) is inked and then stitched in place. I felt the title looked best vertical on this page
I love that in scrapbooking that there are no rules !!!! If I want to put something sideways I can... LOL  !!!
I love this photo of Ella playing with lipstick.


Thanks Heather for these great pages.
Dont forget to enter our competition too!

Stay Safe
Natalie
xxxxx