Showing posts with label feathers. Show all posts

Tuesday, September 11, 2018

Colouring Chipboard with Pencils

Hi Everyone

It's Wendy back for this months projects and a couple where I have gone back to something I enjoy immensely and that is colouring with pencils.  The adult colouring in phase is going gangbusters at the moment and I have to admit that I have been caught up in the craze for a while now.  What can I say I just love to colour! You can also achieve a beautiful finish using pencils to colour directly on chipboard as well (note the higher wax content of the pencils gives better coverage).

The first project is a "postcard" and like a couple of my previous projects this was just part of a pull-a-part book I picked up a typo.  The project just lets the chipboard stand out (I have inked this in archival black).  The colouring does take a while but the end result is so worth it. I have also used some black rhinestones to make it really pop!


The next project you can see how vibrant the colour is on the feathers - this has been done with prisma colour pencils.


Hope you like these projects and feel free to contact me if you have any questions about the colour combinations or how to use pencils on chipboard.

Have a great week and keep creating!
Wendy


Chipboard Used


ID0007


IDD0058


Tuesday, March 8, 2016

Catching Dreams and Preparing for Easter

Well, hello there everyone! It's Julianne joining you today, and I will be sharing two projects that I have created, using the wonderful Imaginarium Design chipboard. 

Let me start with my dream catcher. This project is not for the faint of heart (as I learnt the hard way, lol!). I had a wonderful time creating this masterpiece, but it definitely took a little longer than I expected. At least I'll know better for the next one. :)


The best thing about this project is the limitless possibilities in regards to colour schemes and the details added. And Imaginarium Designs makes several different doilies, so there are plenty of options for the centre focal point. 


I have used the Kate Doily for my centre piece, simply embossing it with embossing powder, and adding rhinestones at several different points to add sparkle. 


I have used both the peacock and skeletal feathers (in different sizes) on my dream catcher. They have been embossed with embossing powder, then highlighted with pink glitter glue. 


I have finished the bottom of the dream catcher with strips of ribbon, both smooth and textured, some leather binding, and beads. On the top half, I have added roses and flowers, randomly placed large rhinestones, and some Prima star vines. I've finished with a spray of pink mist on several of the flowers. 

IMAGINARIUM DESIGNS PRODUCTS USED:


.............................................................................................................

My second project is a quick and simple Easter jar, created with an empty Moccona coffee jar. 


Seriously, this project took me all of maybe 20 minutes to complete. My daughter asked for a jar to keep her mini Easter eggs in, and this was the end result. 


I wrapped burlap ribbon around the jar, and adhered it with extra strong tape. I then added a strip of Easter paper over the burlap and finished with a layered cherry blossom flower, felt flowers and resin roses in the centre. I decorated the edge of the paper with teal rhinestones (because a girl ALWAYS needs a little bling!). 

I have glued a rabbit, in a basket, to the jar lid, and finished with two strips of ribbon around the lid edge (one yellow and one teal). 


The cherry blossom has been created using Zing Embossing Powder in teal, then layering each piece on top of the other, to create a raised flower. 

My daughter now has her mini egg jar, and is very happy. :)

IMAGINARIUM DESIGNS PRODUCTS USED:


Thank-you so much for stopping by and joining me today. It has been a pleasure being able to share my projects with you. Don't forget to leave a comment and a little love, and you will automatically be entered into the draw to win a prize back of Imaginarium Designs goodies. 

You can also find Imaginarium Designs on Facebook

If you would like to view more of my work, please visit my blog: 


Until next time, 
happy scrapping and crafting,

JULES


Monday, September 22, 2014

Adore layout and Altered Book By Sue Smyth


I was inspired by a layout I saw recently that used lots of chipboard doors
over a layout. I though I could do the same with frames.
Often the repetition of the same shape or concept 
can look very pleasing on a layout.


I have embossed all of the frames to give them something in common.
Though some I have crackled and aged some for a slight variety.


Some frames do not have a photo in them 
just a resin shape.


Because the frames are so ornate, you can keep the journaling 
and title simple and plain.


Adhere some of the frames to the layout flat and 
others with 3 D tape for a interesting play 
with layers.


A mini Tutorial on the gold crackle frames


Step 1
Spray the frames with Matt black spray paint 


Step 2
Apply embossing medium with a crackle stamp.
I have a crackle roller .


 Step 3 
Sprinkle with gold embossing powder.


Step 4 
Shake off excess 


Step 5 
Heat emboss 

Imaginarium Chipboard 


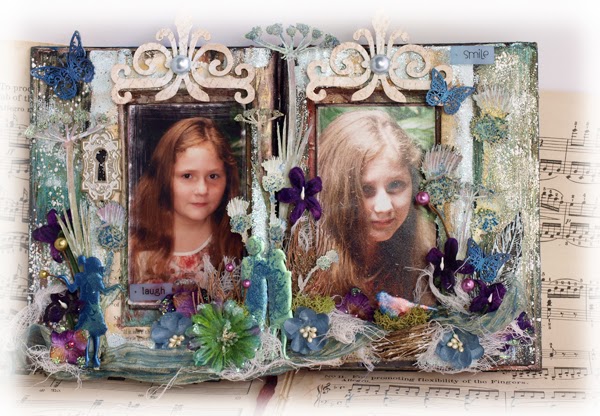
Altered Book 


Old books are easily sourced as a base to start a project on.
I have used an old Reader's Digest here.
Which cost just $1.00


Do make sure it has a sturdy and unbroken
cover to start with. 


Open out to the middle, and this may 
take a little time, adhere every page together 
on each side with gel medium or PVA glue
.

Handy Hint
Tear out every 3rd page or so, to reduce the volume
and the amount of pages you will have to glue.


When dry, use a scalpel to cut out the centre, to form 
a recess for the photos.

I have used embossing powders to alter the chipboard
children, in the same colours as the rest of the project, and painted
the butterflies with Metallic blue paint.

The top flourish, is painted with white gesso, several coats
give a better look. Then I have stamped randomly over
it with a sepia ink. Ink around the edges
in a sand colour for a soft gentle look.


The thistles and wildflowers have been painted with gesso. Then I have
added micro beads over certain areas, with Dimensional magic.
When dry, paint with gesso again and spray with Olive 
glimmer mist. Rub over a little metallic blue paint where
the beads are for greater detail.
I have used a white paint pen to add even more detail to the 
thistle and leaves.


Imaginarium Materials


Happy Crafting