Showing posts with label butterfly. Show all posts

Sunday, June 4, 2017

June Projects with Belinda Spencer

Hi everyone!

Belinda here with you today to share a layout and a card I have created using some fabulous Imaginarium Designs chipboard.

'Beautiful You' Layout


So this layout is my take on the current June challenge at Kraft Plus featuring kraft cardstock plus ONE colour (a touch of white was allowed). I chose RED to match the photo of my daughter in her Christmas outfit.


I had the idea that I wanted to add all of my chipboard pieces to my layout before I added the colour so that's what I did. I glued the frame, butterfly and flourish on before spritzing my layout with water followed by Red Kaisermist and a bit more water.

I dried it all off with a heat gun and then decided that the colour had soaked in to the chipboard a bit too much and wasn't nearly bright enough for my liking. So I grabbed a red Gelato and added some more vibrant colour. I blended it with my finger, spritzed on a little water and blended a bit more.


I coloured the heart and the title with the Gelato too before layering everything else ontop of the chipboard. I love the way it turned out and think I might make a whole rainbow of layouts using this colour stained technique.

Here's what I used:

IDS0059 Monarch Butterfly


IDFL0030 Merrilee Flourish


IDD0053 Loolabelle's Frame


IDW0072 Beautiful Delightful Wonderful


Next up I have a card that I created for my daughter's recent birthday. Twelve!!!! She turned TWELVE!! I'm not sure that has really sunk in yet. 

'12' Card


This was a really quick and easy card to put together using some co-ordinating patterned papers and embellishments. I wanted to frame the balloon and the brand new chipboard frame was the perfect fit.


I heat set the frame and the star burst with a gold tinsel embossing powder for some added sparkle to the card.


I covered the numbers with matching patterned paper and sanded the edges just until they were smooth.

Here's what I used:

IDD0054 Loolabelle's Star Bursts


IDN0001 Numbers

Thanks for stopping by today to check out my projects. I hope you will pop back tomorrow to see the loveliest of creations by Miriam.

Cheers
Belinda

Wednesday, January 4, 2017

January Projects with Belinda

Happy new year!

Belinda here today to share my very first post for 2017. I am so excited to be able to share another year of creations using fabulous Imaginarium Designs chipboard with you. I hope you will find some inspiration.

Today, I have three layouts as well as some cute and quirky Christmas cards that I didn't get to share last year.

Adore Layout 1


I tried to make this layout as cute as the photo of my little man. I have gone with a bit of a circular theme with this one and used some paper from the adorable Crate Paper Little You Collection.


I cut a mixture of the coordinating patterned papers to fit the piechart and glued them to the back.


I have stuck to a bit of an aqua and white colour scheme with this layout so I have painted all of the chipboard pieces with a couple of coats of heavy white gesso.


Products used:

IDD0036 Nat's Piecharts

IDD0046 Loolabelle's Callouts

IDS0079 Two Starbursts in a board

IDW0026 Love Cherish & Adore


Adore Layout 2


I seem to be going through a bit of a phase with the whole aqua and white thing because here is another layout using that very same colour scheme!


This layout features lots of lovely layers with little bits and pieces tucked in and around the small photo to frame it. 


I have used a couple of Swirl Corners in their natural raw state as a contrast to all of the colour on my layout.


I painted the butterfly with heavy white gesso and just before it was completely dry, I pressed a piece of scrap printer paper onto it. As I peeled the printer paper away, it took some of the gesso with it leaving a lovely shabby chic look to the butterfly.

Products used:

IDS0002 Butterfly large

IDC0004 Swirl Corner 4 per sheet

IDW0080 Totally Adore Wonderful


Travel Layout


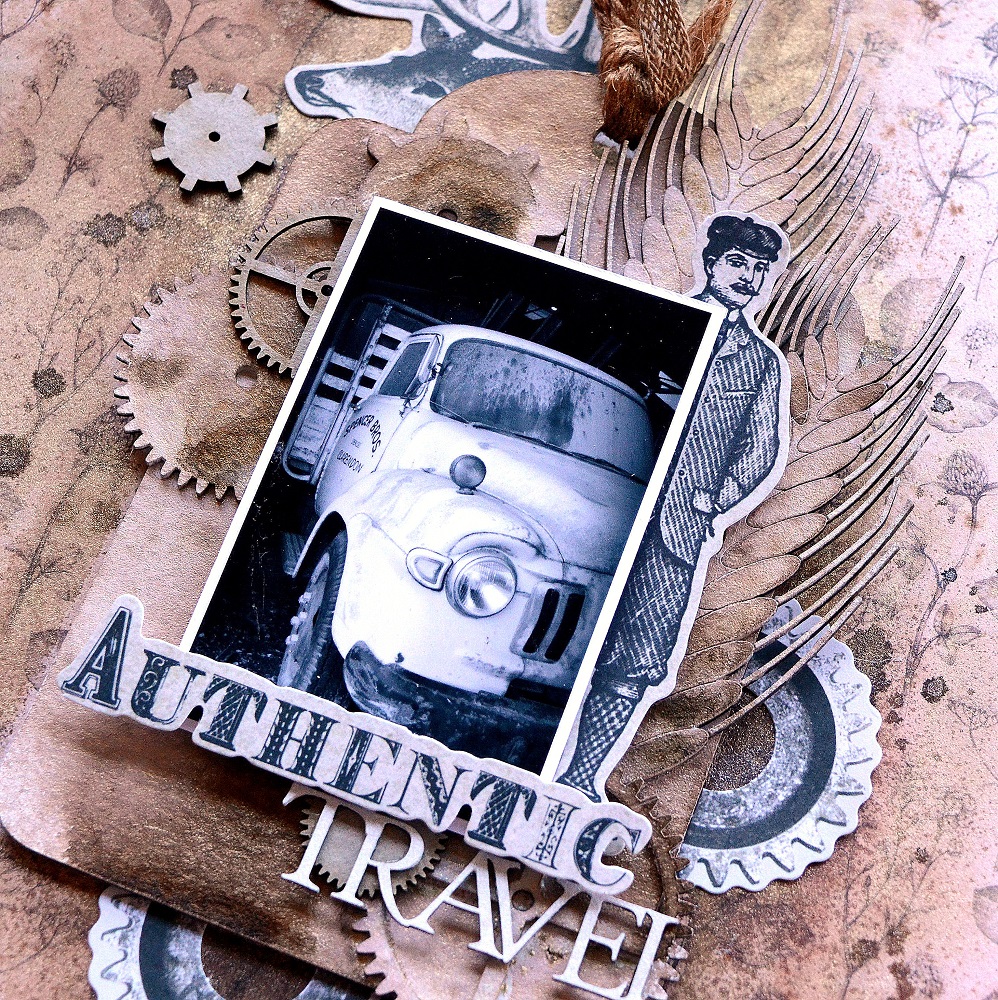
I have gone for a bit of a rustic, vintage look for this layout to suit the photo of the old hay truck belonging to my hubby.

I started with a base of a lovely Australiana patterned paper and a super small photo of the hay truck. I painted a chipboard tag with white gesso and then taped it in position on the patterned paper making sure I could still slide embellishments in around the sides. I also added some twine and natural ribbon to the top of the tag.


I glued some cogs and ears of barley onto the tag and then sprayed the lot with Lindy's Stamp Gang Opal Sea Oats Starburst Spray as well as Kaisercraft Coffee Kaisermist. Once dry, I flicked a bit of the colour over it too.


I added a few raw cogs too and also the word 'Travel' which I painted with white gesso.


Products used:

IDDN0024 4 Ears of Barley in a board


IDS0018 9 Cogs on Board


IDT0021 Cogs Board Small

IDT0017 Compass with Travel Words in board


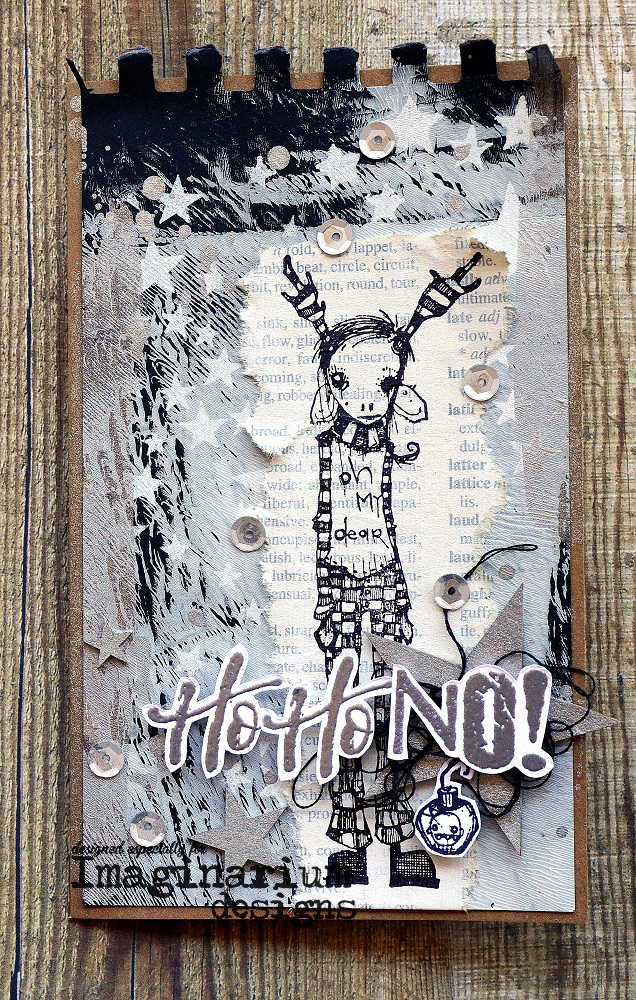
Ho Ho No! Christmas Cards


I wanted to create some cute Christmas cards with a twist for some special friends. I have stuck to a simple black, white and silver colour scheme and of course my favourite chipboard stars were the perfect addition.


I have used just three stars of various sizes on each card and painted them silver using Time Holtz Brushed Pewter Distress Stain.

Products used:

IDS0076 21 Stars in a board


Well that is all from me for now. I hope you have been inspired by my projects. Make sure you come back tomorrow to see what lovely creations Miriam has for you.

Cheers
Belinda


Friday, September 5, 2014

In Shades Of White And Blue

Hello Everyone! It's Julianne here today to share two projects filled with wonderful Imaginarium Designs chipboard. The first project is a photo frame that I have decorated, and the second is a layout I created about my cat Thor.


I purchased this frame at a discount store for $6. It was plain white, with only a resin heart attached by a piece of brown string. The rest of the frame was a clean slate, just waiting to be decorated. I wanted to keep the simplicity of the frame, and not over-power it with decorations and colour. So, I opted to stick with white, and a dash of red.

I started by colouring the word "LOVE". I used red ink, allowed it to dry, then coated it with Glossy Accents, as this would give it shine, and protection from chipping.  


Next, I painted a leaf branch with white gesso, and stuck it to the frame. In front of the branch, I have added a multitude of white roses, all sprayed with Tattered Angels Dazzling Diamonds Glimmermist for a subtle shine and sparkle. I have adhered the roses using Helmar Liquid Glue Dots as this allows time to reposition the flowers (if necessary) before they dry. 

The butterflies have also been painted with white gesso, before being coated with an iridescent white embossing powder. I have finished the butterflies with two tiny pearls added to the centre. 


Lastly, I took Denise's Art Deco Embellishment 1 Border, and cut it in half. I then painted it with white gesso, before adhering it along the roof edge of the frame. I then finished the roof edge by added more flowers, rows of pearls, and another butterfly. 

So, I have taken a cheap $6 frame, and turned it into a gorgeous present for a special someone. Who said scrap-booking had to be expensive? 

IMAGINARIUM DESIGNS PRODUCTS USED:


.............................................................................

Now, on to the shades of blue, with my layout "Hello Pretty Kitty".
I really didn't have a plan when I started this layout - all I knew was that I wanted to scrap a picture of my cat Thor. But I wasn't sure what colours to use because he is ginger, and the background is boring. So I opted for shades of blue - he is a boy, after all!


I have used numerous techniques, textures, and mediums in this layout. The background was created using mist sprays, plumber's tape, and washi tape. I have used crushed glass glitter, and glue, to create the sparkling "drips" that hang from the top and bottom of the layout. And I have used Viva Ferro texture paste and a stencil, to create the border patterns on the layout.


I have taken Loolabelle's circular cross hatch and cut it in half, painted it with white gesso, and adhered it under the photo, on opposite sides. The title "HELLO" has been coated with black ink, then heat embossed with Stampendous Aged Black Embossing Enamel. 


The butterfly has been coated with grey ink, then heat embossed with a silver iridescent embossing powder. I have finished it by adding a Prima crystal to the centre. 


And finally, the corner flourish and the wrought iron embellishments have been coated with grey ink, before heat embossing them with Stampendous Aged Silver Embossing Enamel. I just love the rich metallic look that is achieved with embossing enamel - it is a gorgeous mixture of lush and vintage. 


And who said I can't have flowers just because it's a layout about a boy? (Even if he is just a cat).
Of course I've got flowers - and bling! 

IMAGINARIUM DESIGNS PRODUCTS USED:


So thank-you for stopping by today. I hope my projects may inspire you to try something new, or even something different. Sometimes, the best outcomes are created by experimenting. And don't forget, if you have any questions about these projects, just ask away - I am happy to answer your questions.

Now, don't forget to leave a comment and a little love so you can automatically be added into the draw to win an amazing Imaginarium Designs pack of goodies. You've got to be in it, to win it! 

If you would like to view more of my work, please visit my blog: 

Cheers and Hugs, xxx
and I hope I'll see you again next month. 
Julianne.