Showing posts with label flowers. Show all posts

Saturday, May 13, 2017

Saturday's are splendid for a spot of chipboard...

Hello everyone!!
So glad you've come to visit,

We have recently sold our home, so I've been ticking things off my list all month!!
I always try to craft each day, some of the days it means I look wistfully into my craft room...
it was the last thing to pack and, 
It will be one of the first things to be unpacked!!

I was 'gifted' some beautiful photos recently, I tell our family and friends if they give me photos then I will give them back layouts - it means I have a constant flow of different photos, with different people... so I never get bored!!

REFLECTIONS


I bought a few sheets of patterned paper, did a little fussy cutting then adhered it all done - easy!!
Well, yes I did fussy cut all the fairy images and some flowers too - I know there is a few who don't really like cutting out images but it is quite relaxing for me - I have a little tray and my favourite scissors and can sit with our family and have a 12x12" page done in no time!!
Hello to little Phoenix - photo taken in the cutest mini clawfoot tub!!


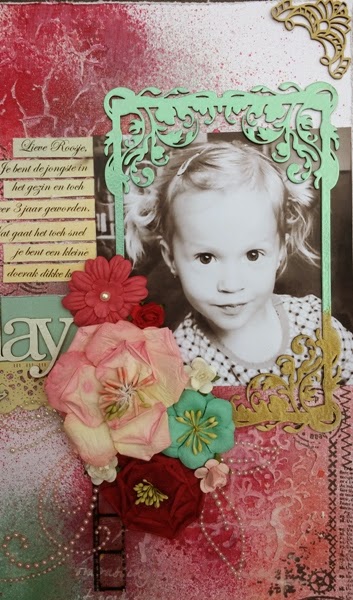
How lovely is this border strip!!
I swiped some Distress Oxide, sprinkled a little water, dried it and then randomly spotted some glue to sprinkle over a glitter and Prills mix for some pretty texture.


The corner flourish just had a swipe of Distress Oxide ink...
so the fairy had somewhere nice to rest for a minute or two...

Me & You... You and Me...


I started with a lovely sheet of paper and roughly swiped a Distress Oxide in a 't' shape,
randomly stamped with 'brown' ink,
trimmed some coordinating paper into random width lengths and then snipped a banner in each end,
adhered the strips, the photo tucked into the Clock chipboard, added some flowers,
Photo is Shakaela's selfie with Christine, our niece.


The title is actually joined together when you purchase it but I wanted to stretch it a bit longer down the page, so I simply snipped it apart,
I spritzed the title with a couple of shades of mist and then a touch of fine glitter over the ampersand,
the swirly flourish under 'you' is misted in a shimmer spray.


A super quick flower - a circle of material, misted then adhere the curved pieces to form a contemporary rose - spray adhesive and a sprinkle of fine glitter for a bit of sparkle.

BEAUTIFUL GIRL


This is a great way to get a bit of value from the more expensive sheets - cut off the part you really like then trim the remainder in half and stick back together to form a whole sheet but be sure to turn them to the reverse for the contrast.
Photo is Emily's friends newborn Clara - she is a Doctor Who fan!!


If you know me, you'll know I am not great friends with glitter (it just hangs around far too long and wears out it's welcome!) but occasionally, it has a purpose - mostly anything Christmas, and little girls projects? After inking with a metallic ink a randomly sprinkled some fine glitter (Every project has glitter today, made at different times so I have surprised myself!! haha) A little bit more fussy cutting - all the embellishments came from a single sheet which was meant to be constructed into a pillow box - a little challenge to myself to think outside the box?

 
Clock face 4"                           Embellishment Corners
  
Ruth Border                          Beautiful Girl
 
                                      You & Me                       Loolabelle's Piecharts and Hearts Embellishments

Chipboard is such a lovely addition to a layout, card or Off the page project, it just adds something special!!
There is so many options to colour or alter the original 'out of the packet' piece... unlimited options!!

Thank you for visiting, 
Alison xx

Monday, August 17, 2015

Summer pages plus a card by Agnieszka Bellaidea

Hi!
It's Agnieszka Bellaidea again with several new projects.
First a page about me and time :)
Love this clock from a photo and made my page using the very same color.


For my shiny corners I used acrylic paint in Old Gold by 13arts.


Feather was painted with gesso and just a touch of Old Gold.
Leaves - with Vivid Green also by 13arts.


Second page about somebody much younger.
This beautiful little girl has a strong personality and loves to spend time in her garden.
Her bigger dream is to dance but first she has to be able  to walk.
She is waiting for another operation and her chances are growing!


This time I used mists to paint my corners - Pastel Berry and Light Brown.


These lovely big leaves were painted with a mix of Matt Cocoa and Old Gold.


Now it's time for a card.
For all 3 projects I used papers from different collection by Bo Bunny, love to mix them up.


My dragonfly got his color thanks to acrylic paint in Matte Turquoise by 13arts.


Thank you so much for looking!
Remember, give yourself a chance to win wonderful chipboards by Imaginarium Designs and leave some comments.
Maybe even a suggestion for my next projects? What would you like me to create in October?

Tuesday, April 7, 2015

Three Layout's by Amy

Good morning everyone, 
Today I would like to show you a couple of layout's I made using some awesome Imaginarium Designs chipboard.
All the layout's are made with Studio 75 papers where I am a design team member. These papers are of such high quality that they are awesome to work with.
Last month I told you I was having a giveaway at my blog {sorry but I was so busy that I forgot} but tomorrow I will make a video {if it will work} with my belated birthday give away which would include some of these gorgeous papers & Imaginarium Designs chipboard.
Now for my layout's:

Hello Beautiful: 
This is a picture of my beautiful cousin who lives in the USA at her friends wedding.
I am totally in love with that frame if I could I would use it on every single layout hehe but I guess that would become very boring to look at right? 
Lets have a closer look: 


chipboard used: 
If you love the chipboard pieces I used you can see/buy them here: 
For my next layout, I used a picture of Kevin and his girlfriend I didn't even know that this picture was taken before she posted it on her Facebook page so cute that I had to scrap it. 

First Love: 
As most of you already know I love Imaginarium Designs frames here I cut out the middle part to make it into a frame.....and it totally looks so pretty on my picture I think.
Let's have a closer look: 


chipboard used: 
If you love the chipboard pieces I used you can see/buy them here: 
As for my last layout I made this for my BoBunny teammie Tracee as a gift maybe some of you have seen this coming by on Facebook and for the people who didn't see it jet. It's a picture of her husband & son going to the casino. I just loved the old fashion look of the picture that I had to use it with this Mrs & Mr Black collection.

Your Time:  
 I didn't use any flowers and it still looks cool as I may say so lol.
 I have a fear for not using flowers. I loved Romy her idea of using the propellers on the gears that I had to try to....thanks hon.
Let's look closer: 


chipboard used: 
If you love the chipboard pieces I used you can see/buy them here: 
At the moment I am working on a OTP with ID chipboard that I will show you next month.
Please don't forget to visit my blog tomorrow.
I hope I inspired you to used your Imaginarium Designs chipboard and create something beautiful.
Thank you so much for being here and please don't forget to leave a comment on this post to be in the monthly draw to win a package of  some BEAUTIFUL Imaginarium Designs chipboard.
You can also visit the Imaginarium Designs Ning Site to see the awesome work from all the DT ladies and Imaginarium Designs lovers.

Love 


Tuesday, June 3, 2014

Box for my cards.....with Amy

Happy June everybody,


It's Amy here with you today and I would like to share a altered box, 3 cards and a layout.
Gloria Stengel is a wonderful scrapper and I saw her make one box a while back to put her cards in.
I thought "well" that's a wonderful idea I'm going to make one too.
I find myself always in need off cards but now with this box I can create cards and then put them away for a special occasion.
For this special project I used a chipboard piece I had for a long time and never thought I would use it because it's so large.

Card Box:


I painted the frame with gesso and then colored it with slightly off white paint, and in the middle with colorbox moss green paint! After that for the middle part I used crackle accents and for the outside part clear embossing powder.


chipboard used: 
code: IDFR0014 RRP
code: IDC0009 RRP

Other products used "Botanical Tea" by Graphic 45, shabby chic door pull, BoBunny's Primrose jewels and flowers by Petaloo and Manor House.

Card 1: Baby Boy 


chipboard used:
code: IDFR0004 RRP
Code: IDW0043 RRP

Card 2: Best Wishes 


chipboard used: 
 code: IDT0014 RRP
code: IDP0085 RRP

Card 3: Happy Birthday


chipboard used: 
code: IDP0079 RRP
code: IDT0008 RRP
code: IDDD0008 RRP

   Now for my layout I totally went a whole other direction it's so not my style but I had a blast creating.
I used tons off Lindy's Stamp Gang sprays and embossing powders and off course the amazing ID chipboard.

Birthday Girl: 


chipboard used: 
 code: IDN0002 RRP
code: IDDD0011 RRP
 code: IDFR0013 RRP
code: IDW0043 RRP
code: IDW0044 RRP

I apologize for my long post but, I hope you all like my work. 
Thank you so much for being here and please don't forget to leave a comment on this post to be in the monthly draw to win a package of  some BEAUTIFUL Imaginarium Designs chipboard.
You can also visit the Imaginarium Designs Ning Site to see the awesome work from all the DT ladies and Imaginarium Designs lovers.

Love