Showing posts with label Nadia. Show all posts

Thursday, May 10, 2012

Special Cards for Special People

I always love getting cards from our design team. This form of scrapbooking is something I am not good at, and with so many talented ladies on our design team who are experts at it, there  is no need to ever show any of my cards.  Today I am going to show some amazing cards  from the Design Team "Girls". First up is one from Gloria, who is in a class of her own when it comes to making cards.

She has a beautiful card to share today. Using papers from Graphic 45 and one of our butterflies. This cards is very special and deliate and pretty. Who could not be delighted to receive this card in the post! 


IDS0002 Butterfly
  Gloria painted the butterfly with white acrylic paint.  She allowed it to dry completely. Then, inked the butterfly with Watermark ink, and dusted with various mica powders to give it a soft, pastel shimmer. She the inked the edges with Wisteria chalk ink.


For the flowers:  Gloria create flowers with die cut shapes. She inked all edges with chalk ink to match the theme of the art piece. She did a lovely job of hand making her flowers.

For the alphas: Gloria inked each letter with Frost White pigment ink. She sprinkled the letters with violet embossing powder and heated them. Gloria allowed some of the white ink to peek through for a distressed look.
IDALC0001 Lowercase Letters


Don't you love the flowers, they are simply amazing and they must have taken lots of patience to make. Gloria has done a wonderful card, perfect any special occasion. As I said she is in a class of her own when it comes to cardmaking.
Supply List:
Imiganiarium Designs: Extra Large Butterfly, Lowercase Letters
Paper: Graphic 45 Little Darlings: Heaven Sent, Cherished, Little Treasures
Die Cutting System: Spellbinders Grand Calibur; Die templates Grand Peony Creations, Rose Creations, Bitty Blossoms
Wire: Artistic Wire
Crystals: Prima leaves; craft supply branches
Ink: Clearsnap Colorbox: Pigment Frost White; Fluid Chalk Wisteria, Lime Pastel, Orchid Pastel; Watermark
Embossing Powder: Stampendous Violet
Mica Powder: Pearl Ex Pearl White, Duo Green Yellow, Interference Violet; Cosmic Shimmer Silver, Pale Gold
Paint: Deco Art Acrylic White
To see more of her work, visit Gloria's Blog
Gloria Stengel

Next up I have a card from Nadia, again another amazing cardmaker. Don't you love this card, it has a shabby chic look to it, so pretty and fresh. Nadia also is in a class of her own when it come to her work.


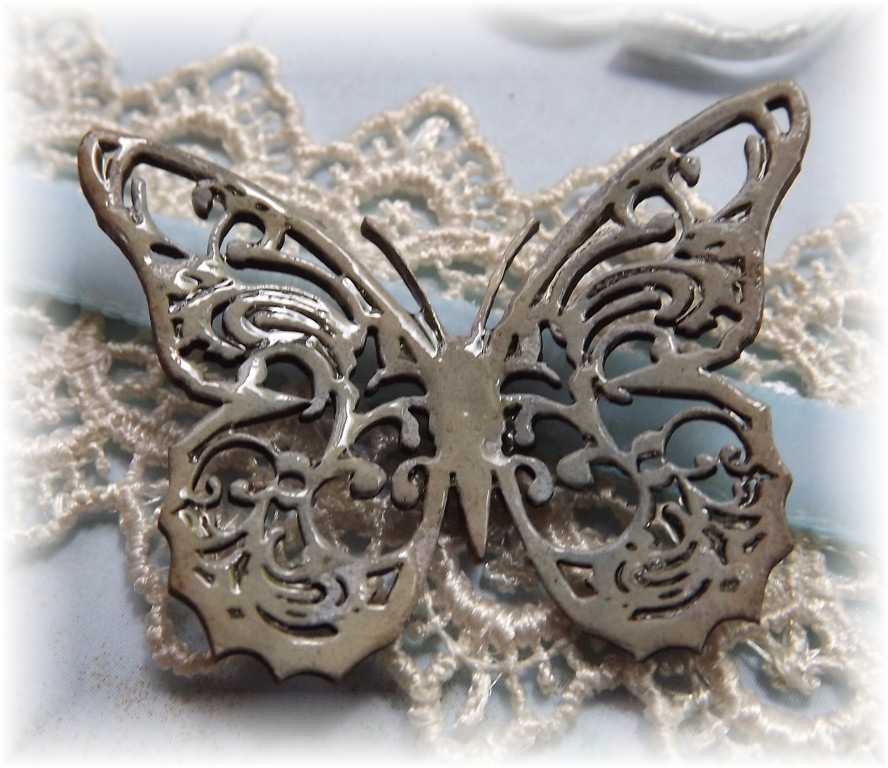
Nadia has done a simply beautiful card and I love the finish she applied to her chipboard. She has included some tips for using the chipboard and how to get the look she has.


IDS0002 Butterfly

"For the butterflies and other chipboard pieces - apply gesso, then dab light coloured ink and with your fingers run a darker paint in random places on the chipboard. Finish with a coat of Glossy Accents".
IDT0014 Small Butterflies on a Board

IDS0009 Bird Cage

 "For the birdcage - apply gesso and dab brown ink at random places and leave as is. For the butterflies and other chipboard pieces - apply gesso, then dab light coloured ink and with your fingers run a darker paint in random places on the chipboard. Finish with a coat of Glossy Accents."


IDC0007 Coners with four Circles Small

Just look at the attention to detail Nadia does with every project she makes, whether it's cards, layouts or off the page projects, she is meticulous  in in her attention to detail.
Again other amazing card, perfect for any occasion .
Materials List
Ribbons
Prima Print Papers and flowers.
To see more of Nadia's work visit her blog
Nadia Cannizzo

Another Card I want to share, as I said the Design Team are experts at Cardmaking, is one from Sandie and is perfect for Mothers Day which is coming up soon.


Don't you love Sandie style of paper crafting, it is always so classic and pretty, delacate and dainty. What Mum would not love to receive this card on Mother's day. Again I love the finish Sandie has applied to her chipboard
Here is what Sandie had to say about the process of making her card and the finish she gave to the chipboard.
"I applied texture paste to the 'Mum' chipboard piece (IDW0021), and lightly pounced with the end of my paint brush to give the chipboard a more textured appearance.  I wanted the inks when I coloured to sink into the crevices, and be more intense in colour. Painting with Gesso after the texture paste has completely dried, allows for a nicer surface to ink on.  The distress inks I used are 'Walnut Stain' and 'Stormy Sky', and each was carefully applied to one half of the chipboard, blending slightly in the middle to give a more variegated appearance.


The butterflies (IDT0014) were simply painted with gesso and inked lightly.  All surfaces received a generous coat of Glossy Accents."
Imaginarium Designs: 4 Small Butterflies (IDT0014), Mum for Cards (IDW0021)
Papers: The Scrap Cake, American Craft Cardstock
Flowers: I am Roses
General Craft: Double Sided Tape, Velvet Ribbon, Guipure Lace, Sewing Machine, Thread, Texture Paste and White Gesso
Ranger: Distress Ink 'Walnut Stain', and 'Stormy Sky', Glossy Accents.

To see more of Sandies work visit her blog

Last up I have a card from Nat. Again a beautiful card and one she made for a friends wedding, it almost a gift in it's self.  Nat also makes amazing cards and I have been lucky enough to have received a few over the years. I treasure them all.


She created this card for her best friends wedding. She is what she had to say about her card.
"I'm lucky enough to be able to get our wonderful chipboard man, John to custom cut their names which was perfect for this card. I used the Edward relief border and altered it to create an interest strip on the card. I inked the ID in charcoal ink first and then used metallic silver memory mist to give it some colour".


Nat has done some punching using some of Martha Stewarts border punch's and layered them on her card.


Don't you love the touch of bling on her card. I love the way she has clustered her flowers. Who would not love to receive a card like this and I love the fact that it can stand up.

The custom ID names are simply sprayed in cream household spray paint! It does the job perfectly!
Again another amazing card from Natalie. 

Material
Making Memoreis paper
Bazzill
Prima flowers
Green Tara flowers
ZVA flourish
Martha Stewart doily and punches
Maya Road Crystals
To see more of Nat's beautiful work visit her blog

The Design Team Ladies have certainly got cardmaking down to a fine art as seen here. Who would not love to receive cards like the ones above. Thanks to the Ladies for sharing their skills with us.
Just would like to wish all the Mum's, Mom's and Mothers a happy and wonderful Mother's Day. A special wish for those who have suffered the lost of a child and for who Mother's Day will have a special memory.

Friday, March 30, 2012

Beautiful Layouts

What a treat I have for you today. 
The team has been sending me some wonderful layouts and I am going to share some with you today.
First is one of Nadia. I love the way she has used paint on her layout and on her chipboard.

Nadia used the same technique on all three pieces of chipboard. This kept an even flow of colour and made the three pieces match.

Nadia first went over the chipboard with white acrylic paint.
  Once the paint was dry she then went over it roughly with a vanilla coloured ink.

 lastly Nadia randomly dabbed some gesso on top of the chipboard
 and inked the edges with a dark brown ink pad

This is one of our most popular Chipboard fence with its  Heart top.

Just look at all the layering she has placed on her layout, paint, paper, gauze, chipboard and flowers.


 Clock without Hands


Love, Cherish and adore Board

  
Other Materials
Bo Bunny : Paper, metal embellishments
Petaloo: Trumpet Vine Spray (teal), Canterbury Roses (brownie)
Prima: White flowers, small brown flowers
The Crafters Workshop: 12x12 Chicken Wire mask
Dies: Spellbinders Shapeabilities Fleur de Lis Motifs Cheery Lynn Designs English Tea Party  doily dies.
Gesso
gauge
brown ink
Liquid pearls

Thanks so much Nadia for sharing this lovely layout with us today. 
To see more of her work, visit her blog.


Next is a layout from Lady Grace. Again she has used paint on her layout as part of her background.
Here is what she had to say about her layout. 
Her layout looks simple but when you look at it closely, she has lots of elements to it. 
Lady Grace has painted, done some stamping and even a hand draw banner.
"I am sure you all agree with me that chipboards are one of our go-to products. We use them as a background, for masking, embellishment or sometimes a filler to complete a page."

"For my first layout, I have used one of the butterfly chipboard shapes as my photo matting. I used the large butterfly to draw the eyes of the viewer to the photo, making that part the focal point of my design."

I painted the butterfly first with white Gesso acrylic paint before painting it with a yellow paint. I did this to make the yellow hue look lighter. Then, I added some orange stickles to add texture to the chipboard


Products Used: My Minds Eye patterned papers and embellishments, Gesso acrylic paint, Hero Arts and Ideaology stamps, Kaisercraft Acrylic Paint, Ranger Stickles and Washi tape.
Thanks so much Lady Grace for sharing this delightful layout with us today. To see more of her work visit her blog at. Lady Grace Belarmino
And to finish up today's post is a beautiful layout from Larissa.
Just look at all the work on this page. Again layers and layers of papers, fussy cutting, flowers, chipboard and more.


She has distressed her papers by tearing them and adding inks and mists sprays. She has even done some boarder punching along the edge of some of her paper.

IDS0023 Girl silhoutette

Larissa has used one of our Girl Silhouettes on her layout which she inked black


Materials used.
Bo Bunny Country Garden collection

Thanks so much Larissa for sharing this stunning Layout with us today. To see more of her work, visit her blog. Larissa Albernaz

Thanks so much Nadia, Lady Grace and Larissa for your lovely and detailed layouts. Please leave a comment to thanks the Ladies.

Wednesday, March 21, 2012

So Pretty and Delicate

I have a wonderful job. Every month some of the most talented ladies thought the world send me photos of there amazing projects using Imaginarium Designs.I love every project I see. We are so lucky to have a amazing team of wonderful ladies. Once I receive them  I then get to share them with you. Today I have some delightful projects from two of our wonderful Ladies  Kaori and Nadia. First is Kaori and she has made a beautiful wall art piece. 
Look at all the detail she has added, layers and layers.

I wish I could share some more information on what she has done to the chipboard, but I don't speak Japanese! so it's a bit hard

Lots of beautiful chipboard all layered together.


I love the projects we receive from our three Japanese Ladies, they have a different style to the rest of us  they are so talented and their work is just beautiful .
 Thanks so much for sharing your work with us Kaori.
To see more of Kaori's work visit her blog.
Kaori Fujimoto

 Next is Nadia's layout. Nadia is an Australian Designer and I love her work. She is a warm and wonderful lady. Today I am sharing one of her beautiful layouts.

She has include her own description of the process of putting her page together


"So, I went to town with all awesome pack of chipboard and used many pieces on here. Once again, to bring it all together, I simply left all the chipboard bare, but created a mixture of gesso, white paint and brown ink on 3 separate parts of a piece of cardboard and using a sponge I dipped it on the 3 mediums and while I had all my pieces of chipboard on a piece of paper, randomly either splashed the mediums on the chipboard or dabbed them roughly and randomly. I then got a dark brown ink and coloured my title and other areas of chipboard so it some of it stood out. Lastly, I layered it randomly all over the page"

A close up of the amount of detail that Nadia puts into her work
Love all the layering, just look at the way Nadia she put it all together.
To see more of Nadia's work, vist her blog.

Don't you love the two projects today from two of our design team ladies. Both have created a project to treasure.
Thanks so much for sharing. I have some more two share on Friday.
See you soon.


Thursday, February 16, 2012

Nadia .....

Hi everyone! 
Nadia Cannizzo here sharing my very first Design Team work for Imaginarium Designs. 
I have been using this beautiful chipboard for a while now so putting together these projects for me was pretty quick and easy as the style of chipboard suits my style entirely.
Firstly, a HUGE thank you to the wonderful folk at Imaginarium Designs for the very generous Design Team pack they sent all of us! Loving it !

So here is what I created for your inspiration this month.
Creating 12x12 layouts is second nature to me. It's all I EVER do!! So I decided this time to challenge myself to create something different and I thought creating some lovely tags as gifts was a clever idea and something I could probably handle! I also wanted to show you how versatile this chipboard is and boy was it SO easy and quick to create these. 


This first one is a gift for my eldest daughter who is 5 years old. I called it "Our Story" and explained to her that every family has a story and her story is that she was the first born child of this family. I used soft colours and a beautiful 3" Clock Face Imaginarium Designs Chipboard to give this tag a romantic and feminine touch. What little girl wouldn't love this hanging on her wardrobe knob or her door? I can tell you MINE did!


Now, I will confess that I am no champion at doing all kind of fancy things with chipboard but I find that a little 2 tone ink and some glossy accents on top will create a stunning result which is what I have done here. SO all you need to do is go over the entire chipboard with gesso a couple of times allowing for it to dry each time. The you start with the light coloured ink and go over the chipboard a couple of times and the what I did is take the darker ink and dab it randomly over the edges. Once that is dry just over it with Glossy Accents and you are done! As I said...no fancy stuff here!!


Products List
** Imaginarium Designs Chipboard:  3" Clock Face
**Webster's Pages Winter's Fairy Tales : paper, fabric tag, fabric bloomers,
**Kaisercraft : paper blooms (fuchsia)
**Prima Marketing: large white flower
**Martha Stewart: Punch Around The Page Cherish paper punch
**gesso
**Glossy Accents
**light and dark pink ink (brand unknown)
**gauge
** string
**brown tag
**Glimmer Mist : Coffee Bean


My next tag was a gift for my second little girl who is 3 years old.  She loves bright colours so I knew this would appeal to her. And it did! I layered a couple of different Imaginarium Designs chipboard pieces as well as some other elements and again I applied the same technique to the chipboard as I mentioned above.

Products List
**Imaginarium Designs Chipboard: "Love You" title and Swirly Frame
**Webster's Pages Winter's Fairy Tales : fabric bloomers, flower

** Prima Marketing : Shabby Chic Metal Treasures - Bird Cages/Pillars, Romantique rose

**Light and Dark purple ink (brand unknown)

**white and purple ribbon (brand unknown)

**Gesso

**Glimmer Mist: Coffee Bean

**Glossy Accents

**Brown Tag


My last tag is for my super sweet friend also named Nadia, who lives just a couple of minutes away from me. She has helped more than she knows the last few months and I wanted to give her something handmade by me as a token of my appreciation.


I wanted to keep this tag romantic looking but still elegant to give to a 30 something mum so I changed the colour scheme a little. I used an Imaginarium Designs LARGE Butterfly placed on top of some flowers as well as an Imaginarium Designs Mirrored Frame. For the frame, I simply used Gesso and nothing else a few times to give it a rustic look, while for the butterfly after applying gesso a few times over it I inked again randomly with a brown ink.


Products List

*Imaginarium Designs Chipboard: Large Butterfly and Mirrored Frame

**Webster's Pages Winter's Fairy Tales : fabric bloomers

** Prima Marketing : Green flowers, Romantique rose, pearls

**Martha Stewart: Deep Edger Punch (Vintage Doily)

**brown ink (brand unknown)

**pearl ribbon  (brand unknown)

**October Afternoon: Mini Market alpha stickers

**Gesso

**Glimmer Mist: Coffee Bean

**Glossy Accents

**Brown Tag

**gauge


Lastly I want to share with you my last project which is one of my little 3 year old! 

As soon as I had the Imaginarium Designs title "Adore" in my hands and her close up picture it was a match made in heaven as I, simply put, cannot find another way to describe what I feel for her little sweet face.

For the title I used the same old trusted method I used in the tags above, which includes the inking and then covering in Glossy Accents.


This was one of those PERFECT pictures you catch of your children which are SO rare so I wanted to "frame" it in a way so what better way to do that than using this 6" Swirly Frame from Imaginarium Designs? I simply once again went over the frame a few times using gesso and once that dried I applied a sand coloured ink and then some clear Crackle Medium on top of that. I then inked the edges slightly.


Lastly, I find that these little Mirrored Frames add a special little detail to the layout and as well as that they create a nice contrast on top of the bright pink.


Products List:

**Imaginarium Designs Chipboard: Adore title, Mirrored Frame, 6" x 4" Swirly Frame

**Webster's Pages Winter's Fairy Tales : paper, fabric tag, fabric bloomers,
**Martha Stewart: Punch Around The Page Cherish , Swirling Lace and Layered Arches paper punches .
**ZVA Creative: pearl flourish
** Flowers: Prima Marketing, Manor House Creations, Petaloo
**leaves, brown ink, puffy paint

I hope I have inspired you all to try something new today! 
Thank you for letting me share my creations with you all