
Hi Bloggers
Today I have a group of little treasures for you. I love working small sometimes, and I hope these projects inspire you to do the same.
Today I have a group of little treasures for you. I love working small sometimes, and I hope these projects inspire you to do the same.
Queen of Hearts mini

First is a little mini album made from a pack of cards and Imaginarium
chipboard as the cover. I have cut pages to fit the frame
and have sewn them together.

Then, I have cut the playing cards to fit the frame and layered them over the top.

The frame has been painted with matt black spray paint and then I have
rubbed over gold paint to edge it.
rubbed over gold paint to edge it.

To frame the Queen of hearts I have used bamboo skewers, which have been trimmed,
painted black and wiped over with gold paint.
painted black and wiped over with gold paint.

The inside pages are alternated blank pages with trimmed cards. I have flicked black
and red paint pens over each card to give shabby grungy look.
and red paint pens over each card to give shabby grungy look.

The heart is a hand cut heart, from chipboard, that I have embossed with aged gold embossing powder. While it is hot I have sprinkled Prills over the top, when it is cooled, the Prills will roll off and leave behind a dimpled surface. then rub in red paint, and dry brush the edges with black gesso. Then I have added trinkets.
Emerging Dragon

For the Scrapbook and Papercraft Expo in Brisbane, I wanted to make a fewextra projects, that did not take up too much room.
A dragon eggs seemed like a great idea, at the time and I think it turned out nicely.

See below for a mini tutorial on how to decorate the eggs surface.
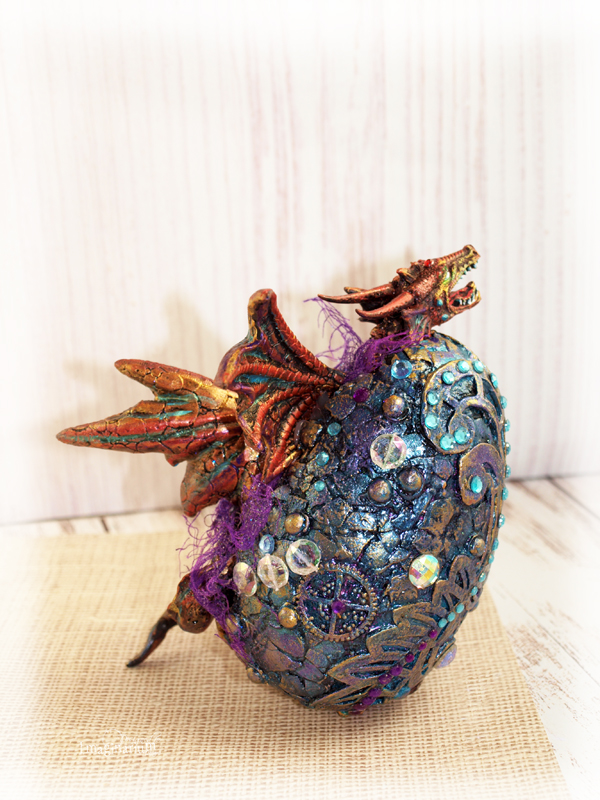
Once I have decorated the egg with chipboard, I have added rhinestones and crystals

This is a close up of the egg, the styro base is covered with chipboard and egg shell, adhered down with texture paste.

Even large chipboard flourishes can be made to adhere to the curve of the egg.

On one side of the egg, I have cut a slit, which I sprayed black matt spray paint into. As the
paint is enamel it will eat away some of the stryo foam and form a cavity for the dragon to sit into.

I have added lead sinkers into the cavity to give the egg some weight and to support the weight of the dragon. For my dragon I have cut up a resin dragon statue with a hacksaw.
For the tail I have molded it with Fimo to suit the shape of the egg.
Bronzed Nest Gift Box

Next is a tiny box from Marina Jewelry Designs,which I could not resist altering.
I wanted to make an intricate piece, with a nest and also inside have a little surprise.

I have started with Moroccan screen chipboard which is adhered to the sides with gel medium.

With small items it is important to have lots of detail.
The pearl strips add that detail to the edges.

For the top, I have layered, a chipboard frame,with metal trinkets, to form a sort of nest for the eggs and nestled a small butterfly on the side.

I have added small rose buds, feathers, small Art stones, and tiny gum nuts, on a bed of green moss.
How to decorate your egg

Cover a styro egg with texture paste ( a bit at a time) set small chipboard shapes such as cogs into the paste. Spritz with water to mold in to the curve. Also add egg shell and clear dew drops into the paste. Add micro beads or prills while wet. For larger chipboard, spritz with water and layer into the paste, use pins to secure down, and leave in place until dry and set.

Paint egg with turquoise Dylusions, then spritz with black dylusions spray and dry off.

Rub the surface with Graphite inka gold. Then a layer of purple, navy and some turquoise to
give an iridescent appearance.

Lastly layer over the top with gold metallic paint.

Now spray with a fine spray glitter to add sparkle.

Here I have made a plain egg with just egg shell and texture paste, with the same techniques,
it shows you how simple you can do an egg.
Here is a little step by step for the gift box.

Cut chipboard border into pieces and adhere along the edges.
Then paint with turquoise ink, and add Ken Olives Colour bursts to suit. ( I have used Violet and turquoise)

The gold leaves have been double embossed and snipped into pieces to
tuck into the sides of the nest.
tuck into the sides of the nest.

To finish I have added large pearls to the bottom as feet.

I have sprayed the bottom with black matt spray paint and nestled a small bird, moss and faux nest inside.
Happy Crafting

Totally awesome projects and great use of the chippies!
ReplyDeleteOMG! Did I die and go to Heaven? All of these are absolutely breathtaking! The Card Mini is a GENIUS idea which I am going to have to borrow and the Dragon Egg is supercalifragilisticexpialadocious! Then we move onto the awesome box which has me drooling! LOVE the bird inside the box!! So sweet! Thanks for starting my day out with the gorgeous creations!!
ReplyDelete