"Shabby Chic Bedroom Scene"
This miniature bedroom is greatly inspired by the mini fan cum lights that I made out from the pinwheel chipboard and some beads and real lighting. Yup. The ceiling fan/lights can light up. This dollhouse is made with a Daiso frame box and cover one side with a cardboard and a wooden window.
I punch a hole thru the centre of the pinwheel chipboard and inserted the dollhouse lightbub and wire thru, added beads from my own jewelry making stash. Also drill a hole in the ceiling of the wood box so the wiring can go through before I attach the wiring to a battery box.
I painted the pinwheel chipboard white.
Viola. Lights up. The fan can be "turned" manually.
I built a false roof with a door to hide the wiring and battery box.
Painted all the pretty chipboards white. I made the top decorative motif to hide and distract the eye from the roof hatch. Made the clay motif with a mold and Martha Stewart airdry clay and added the Denise's Art Deco Corner chipboard in front. Added some flowers and diecut leaves too.
Used the Hexagon frame chipboards as photo frames.

Made this mint green "Shadow Box frame" from hexagon chipboard, layered with foam tapes and painted with acrylic paint.
This is my favourite!!! Love the oval frame with brackets chipboard!! Made into a mirror with Tim Holtz mirror sheet and attached to this wooden table.
All the cosmetics and accessories on the table is diy from scratch with beads, wires, buttons etc. The lipstick is made with clay inserted to a jewlery finding. Can twist open the cap to reveal the lipstick inside. Hee...
Made a simple wall behind. All the clay motifs are diy from scratch with Martha Stewart clay and molds.
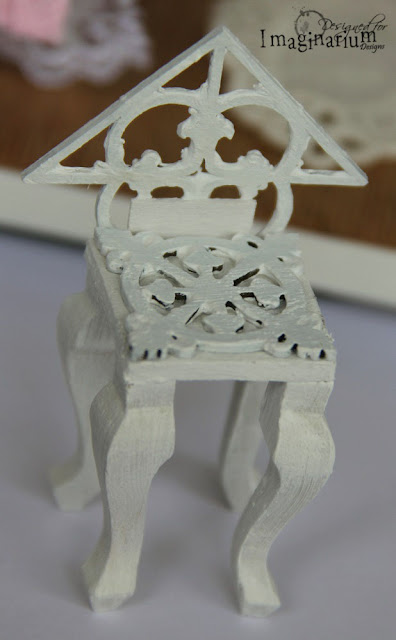
This chair is made from wood sheets, wooden legs and chipboards. Used one Corner with 4 Circles chipboard as the chair backing and one Edward Relief chipboard on the seat.
Made this bed from scratch too using wood sheets, legs and chipboards. The mattress is made with foam wrapped in fabric. The blanket is made with pretty fabric and ribbon (to act as seam binding). I glued the ribbon around the edge with Beacons fabric glue.
The bed headboard is made from the Birdcage chipboard and Denise's Art Corner chipboard. Love it very much!!!
"Blessed" Layout
Made a simple and cleaner mixed media layout. I will be sharing a step by step tutorial below.
Tutorial:
1) Apply clear gesso over the whole page.
2) Spread texture paste over stencils. Heat dry.
3) Mist the gauze blue.
4) Misted the background and adhered the tinted gauze with multi medium.
5) Glued down sequins and dew drops with glossy accent.
6) Inked the chipboards with Viva Decor Inka Gold- graphite. Note: I cut the Denise's Oval Art Deco chipboard into half.
7) Randomly dab white ink over chipboards. And adhered photo and chipboards unto page.
End result.
These are the chipboards I used for the 2 projects:
Hope you enjoy browsing through my projects. Do leave a comment to win a pack of chipboards. Have fun crafting.


Beautiful layout.
ReplyDeleteAnd the little room,
WOW! Amazing
work on all of it.
Carla from Utah
thks for the lovely comment. :)
DeleteCarol,
ReplyDeleteI am in the process of making a Fairy Dust Shoppe and am going to craft steal your light idea! It is pure GENIUS!!
Your scene that you created is darling and I love that you made almost all the different elements!! I love to do that! I also love that you finished the back off so that it can be viewed from all sides!! I am also thinking that I am going to see if I can round up the stuff to make the chairs because I already made a table but was trying to figure out the chair situation and you have solved that!! The hexagon shadowbox frame is another piece that I am craft stealing!!!
Your layout is so sweet. Great colors and the picture is delightful!!! Looks like it was a wonderful day!! TFS!
Ohh.... do share with us when you are done with your project. :) the greatest joy in sharing our crafts and skills is when it had inspired someone. So thks for bringing this great joy to me.
DeleteWOW wow WOW
ReplyDeleteCarol, I am IN AWE of your AMAZING bedroom scene, such INTRICATE and DELIGHTFUL detail - LOVE IT ALL!!!
Your layout is BEAUTIFUL too!!!
THANK YOU for sharing your RECIPE FOR AWESOMENESS!!!
thks for the encouraging comments. It means alot to me. :)
DeleteCarol you have created a cute adorable masterpiece. Gosh...it's awesome. What a lot of creativity. I love and adore all these details.
ReplyDeleteAnd your "Blessed" layout looks gorgeous. I love the way you use the lovely chipboard elements.
You are truly very talented and creative.
Thank you for sharing your lovely art.
Hugs from Monica... Spain
thks for liking my projects. I hope it have inspire you. :)
DeleteWooooW!
ReplyDeleteCarol, your house project is absolutely divine!!! What a clever idea. I also love what you did with the muslin on your layout. <3
ReplyDelete