Wednesday, April 30, 2014

Guest Designer - Yvonne Yam

Today I'm sharing the last post from our Guest Designer, Yvonne Yam...


Hello there! It's Yvonne Yam to share my last project as this month's guest designer - a mixed media tag!


I used watercolour paper for the tag. I used the Imaginarium Designs negative chipboard flourish along with some light modeling paste to create the background. When that dried, I coloured the entire background with gold paint. After that, I added a layer of glass bead gel all over for an opulent sparkle. 


The chipboard pieces were painted with gold and blue paints to match the embellishments.
Hope you've enjoyed the projects I've shared this month and a big thanks to Imaginarium Designs for letting me share my projects with you! :)
Please head over to Yvonne's blog and have a look at her stunning creations
Thanks Yvonne for creating for us this month

Tuesday, April 29, 2014

Different projects by Tanya Palamarchuk

Hello dear friends! 
I hope your spring is warm and cheerful! 
Today I, Tanya Palamarchuck share with you my new projects with chipbboards by Imaginarium Dasign. 
My first project LO, I used a lot of colors and a bright pink color.
This corner I covered with black archival ink and leaves I used a green pigment ink

For the border I used gesso, acrylic and a little white embossing powder

And the word art, I also covered in black archival ink

Here is chipboard that I used:


My second project is vintage minialbum

It includes 2 turns, 4 photos


This corner I covered with gesso and white acrylic, also I used cracle-accent. I got a beautiful view of the age


Tittle chipboard I draw by Disstres ink and also covered cracle.


I used for this project such chipboard:


I hope you liked my work. 
Thanks for visiting! 

Have a great day 

And do not forget to leave a comment, you'll have a chance to win a package chipbord! ;)


Monday, April 28, 2014

Sarah Shares her April Projects

Hello Imaginarium Designs Fans - Sarah here today to share two new projects with you: an Altered Clipboard and a Mixed Media Layout!
~~~~~~~~~~~~~~~
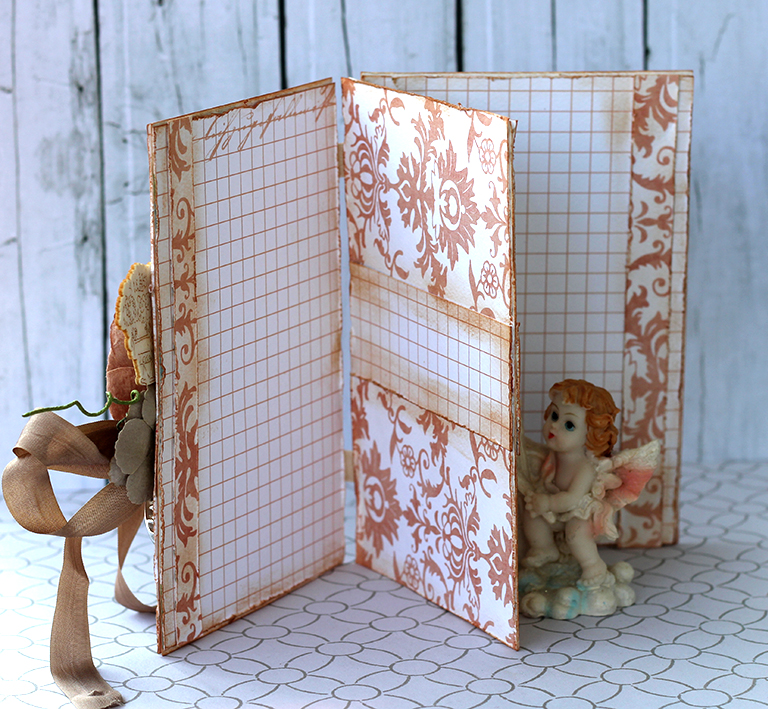
Altered  "Typography"
Mini Clipboard
First up is a mini-clipboard I altered using Graphic 45's Typography collection, embellished with some Imaginarium Designs Tags and some of Loolabelle's Chevrons.
I used two different sizes of Loolabelle's Chevrons #2 and simply painted them with Distress Crackle Paint in Aged Mahogany. I mod-podged sections of the Typography paper onto the tags, inked the edges with Distress Ink in Black Soot and then tied the tags together with some black twine. I finished off the embellishing with some fussy-cut bits from the Typography paper, some Tim Holtz Idea-ology metal embellishments (pen nibs and mini-paperclips) and a cool metal typewriter embellishment I picked up at a local craft store. Here are some close-ups!


Imaginarium Designs Chipboard Used
Loolabelle's Chevrons #2
IDDL0022
 
Five Tags in a Board
IDS0064

Other Products Used
Patterned Paper - Graphic 45 Typography Collection; Mini Clipboard - Dollar Store; Tim Holtz Distress Crackle Paint - Aged Mahogany; Tim Holtz Distress Ink - Black Soot; Tim Holtz Idea-ology - Pen Nibs and Mini Paperclips; Black Twine: Metal Typewriter Embellishment - Michael's; Mod Podge - Matte; Aleene's Tacky Glue; 3D Foam Adhesive.
~~~~~~~~~~~~~~~
you are braver than you believe, stronger than you seem,
& smarter than you think.
Mixed Media Layout
My second project is a mixed media layout featuring a sweet photo of my son! I had lots of fun creating this one - hope you like it!
For the Imaginarium Chipboards on this layout, I have used the following:
  • Hot Air Balloons - painted with Lumiere Light Body Metallic Acrylic in Halo Blue Gold
  • Spade Top Picket Fence - painted with white gesso and then Distress Crackle Paint in Rock Candy and then spritzed with Lindy's Stamp Gang Moonshadow Mist in Tawny Turquoise
  • Butterfly Border - cut into individual pieces - painted with Viva Decor Maya Gold paint in Turquoise and then rubbed with Inka Gold Rubs in Cobalt Blue and Hematite. Next, I stamped the butterflies with a Prima Stamp and Black Ink and finally added some Ranger Stickles in Patina
Here are some close-ups!


Imaginarium Designs Chipboard Used
Butterfly Border
IDB0013
 

Spade Top Picket Fence
IDB0004

Hot Air Balloons on Board
IDS0010
Other Products Used
Patterned Paper - American Crafts - Amy Tangerine Plus One Collection and Studio Calico Lemon Lush Collection (Scraps of Darknesse March 2014 Kit); Lindy's Stamp Gang Starbursts - Time Travel Teal, Shabby Turbine Teal, Edelweiss Moss Green; Lindy's Stamp Gang Moonshadow Mist - Tawny Turquoise; Vica Colour- Inka Gold - Cobalt Blue and Hematite, Maya Gold - Turquoise; Lumiere Light Body Metallic Acrylic - Halo Blue Gold; Dylusions - Black Marble; White Gesso; Hot Glue; Cheesecloth; Aleene's Tacky Glue; Heavy Gel Medium; 3D Foam Adhesive.
~~~~~~~~~~~~~~~
Thanks so much for visiting the Imaginarium Designs Blog today - if you would like to see more of my creations, you can visit my blog: Scattered Pictures and Memories. Don't forget to leave a comment on this post for a chance to win some fabulous Imaginarium Designs Chipboard!

Sunday, April 27, 2014

Romy's Projects for April

Hi there!

It's Romy today and I have three projects to share with you that I made with some beautiful Imaginarium Design chipboard. First off is a lay-out with a soft green, yellow and pink colour scheme:


I wanted to give my lay-out a dreamy look and the chipboard hot-air balloons were just perfect for that. I heat embossed them with white embossing powder.


I also incorporated the phrase 'Cherished Treasures' in my lay-out. The chipboard phrase was heat embossed as well and I also decorated it with a butterfly and some pearls.


My second project is a card that I made. I usually love to work with soft and feminine colours, but decided to go for a masculine look when making this card. 


I love the fact that Imaginarium Design offers some chipboard shapes that are perfect for male projects. I tucked the gears inbetween my paper layers and also added some stars. I heat embossed all chipboard shapes with brown distress embossing powder to give them a grungy look. 


My last project for today is another lay-out that has a monochromatic blue colour scheme. Again I went for a shabby chic and romantic look and of course Imaginarium Design offers some wonderful chipboard that suits this look perfectly! 


I used one of my favourite chipboard pieces, the Anna Frame, to frame my photo on this lay-out.


I also used these love arrows, because I found that they made the perfect finishing touch on my lay-out. 


I hope you enjoyed the projects that I shared on the blog today!

Don't forget to leave a comment on this post for a chance to win some gorgeous Imaginarium Design chipboard.

Have a great day!


Saturday, April 26, 2014

Inspiration by Olga (Pastila) Znamenskaya

Hi all!
Olga-Pastila is today with you! How is going? Hope you are well!

My first work is album for the little girl Alena.

 Chipboard is painted with acrilyc paint.

 "Alena" - chipboard is painted with acrilyc paint and decorated with pearls.

 Star dust - glittered stars


I used

And the second project is dedicated to the Victory Day traditionally celebrated on the 9th of May. 
This holiday commemorates the victory of Soviet army over the Nazi Germany in 1945. (Victory Day marks Nazi Germany’s surrender to the Soviet Army in 1945)
Common symbols of Victory Day in Russia are Red Star medals (military distinction for bravery), St. George ribbons and red carnations usually
given to veterans and to laid at the war memorial sites. 
Every year in honour of this day in all cities across the country military parades, celebrations and fireworks are held.
We keep the memory of this victory carefully and appreciate everything our grandparents-veterans did for us, as we are living just because they are dead!


Thank you!
Visit my blog.
XOXO
~OLGA~