

Hey everyone, it's Miranda here today to share some projects with you! And I also share quick tutorial on a way to texturize your chippies! I hope you like what you see, if you have any questions do let me know! First up is this altered box I created using the Hope Chest paper line. I just loved the shape and details of this box!

For the border piece that I cut apart I painted it with cream paint and then distressed it with Black Soot. Then I added liquid pearls. The dragonfly was gessoed , then sprayed with a few Shimmerz sprays.

I kept the Penny Farthing simple, just a coat of gesso! The flourish was coated as well, then I used frayed burlap distress ink. If you see coming out of the flower cluster little tiny flourishes. Those were part of the Christmas tree chippie, I just cut it all apart.


And now for my little garden drawer :)
I started this project not really knowing what I was going to do Lol. I just had picked up the little flower pots at the store. So I started from there and it turned into this :) I really love it! It cheers me up! I have been really experimenting with color lately! Even purple!

On the flourishes coming out of the flowers I just painted them with gesso, then sprayed with Olive Branch Shimmerz Spritz.

The honeycomb pieces were just painted with gesso and distressed with frayed burlap.

Here is a close up of the clock, tutorial at the bottom of the post :)
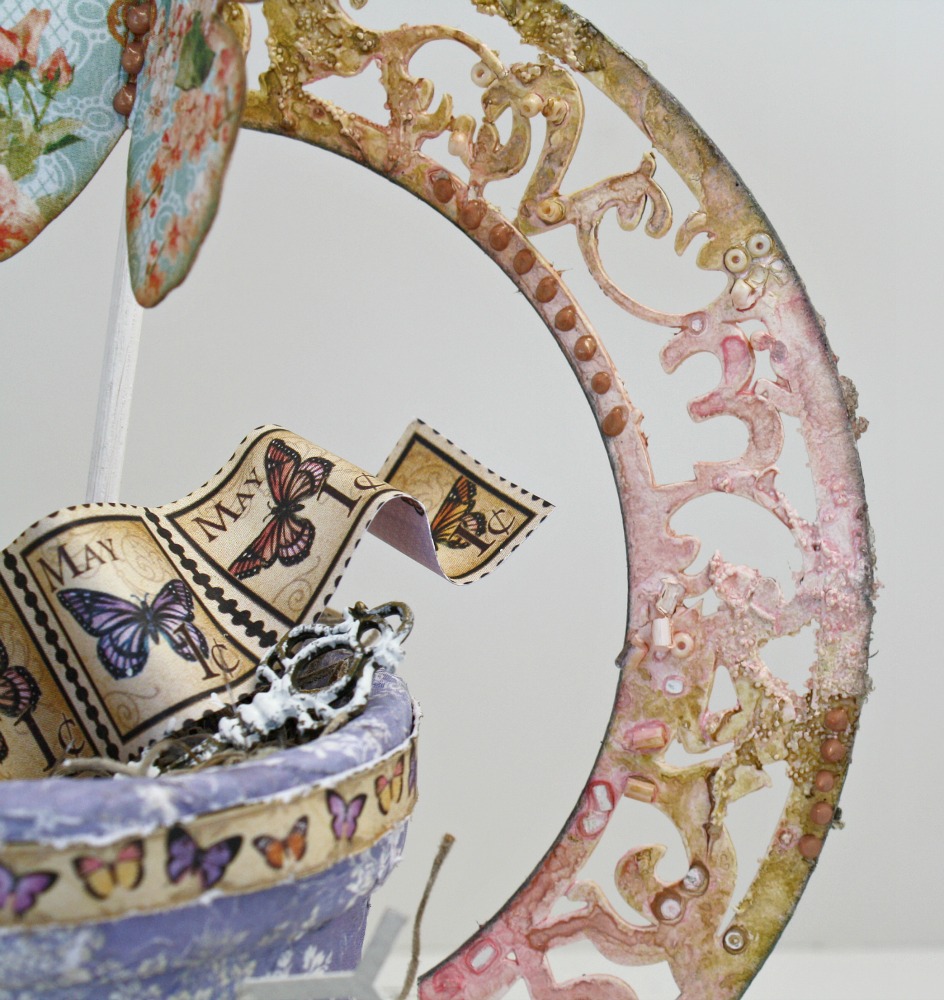
I also cut apart my circles border and painted it with gesso then sprayed with shimmerz.

And now I will share how I altered the clock face.
I started out by applying a light coat of gesso, just for coverage. I used a sea sponge to adhere it.

After that coat was dry, I went back in and put a much thicker coat, focusing on random spots. You will want it to be thick so it will hold the beads we are going to add.

Next I used some seed beads and just little ones I had in my stash. They can be any color cause you will be painting over them. Mine are white and pink. Push them into the areas with the thick gesso.
*Tip* I heat set everything between layers, it will keep your chippie in a stronger state and won't be flimsy from too much inking and spraying.

After I dried those beads, I added some glass bead gel. I clumped it on in random areas, it will look gunky until it dries, then the medium that the beads are suspended in will disappear, and only the little baby glass beads will remain. I love this stuff!

Voila! Lots of texture! I went back over everything with a light coat of gesso before I sprayed.
The colors I sprayed with are Shimmerz Cotton Candy, Olive Branch, and Treasured Hymn. Use any sprays you want to create the colors you like!

A little close up! Before I added it to my project I went in with some liquid pearls for added detail.

Well that's it for me today (long post huh? hehe). I hope you all like my projects! Thank you so much for viewing! Hugs!
Products Used:


You are amazing Miranda!!!! Everything is just so beautiful!!!! Love the garden drawer, it is so uniquely you!
ReplyDeleteJust incredible, love them!!!!!
ReplyDeleteLOVE :)
ReplyDeleteStunning work, girlie! I adore the second project and the technique you used on the chippies!
ReplyDeleteAwesome job really it. What do you do with all your projects?
ReplyDeleteBeautiful projects.
ReplyDeleteGosh, your altered items are seriously incredible! Such gorgeous work!
ReplyDeletetotally amazing :)
ReplyDeleteReally gorgeous projects and stunning design!
ReplyDelete