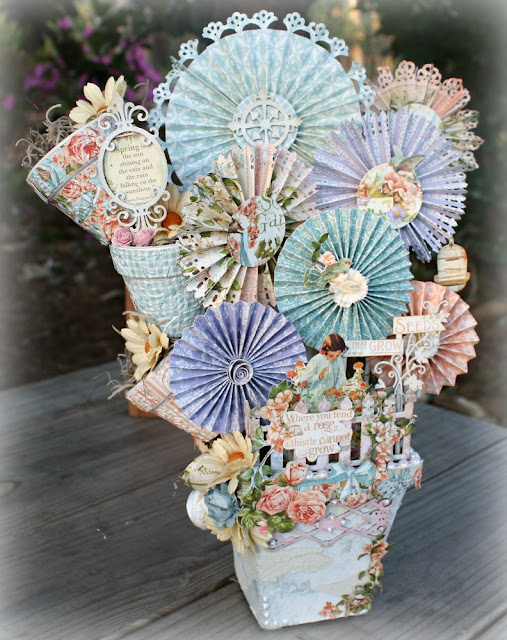
Hello lovely crafters, it's Miranda here today to share some projects with you! I can't tell you how amazing it is to be on this team, to work with such amazing chippies! The possibilities are endless! Not to mention my fellow dt members are SO INSPIRING as well! I'm blessed! My first piece was a labor of love! I had a vision of a "garden" and just built off of that. Lots of fussy cutting, lots of folding papers Lol, lots of glueing! Hope you all like it :)
My Secret Garden
So yep , i did a lot of cutting and folding to make the rossettes! so much fun though!
I saw this idea on Pinterest of gardening vases stacked up together, so i had to try it!!! I really like the effect! For both the Frame Piece and the Edward Relief Circle I simply painted it with 2 coats of gesso and inked the edges a bit.
For the Flourish Shape in the middle of the vase i painted it with pink paint, then used pearl dots to accent it.
I used the gorgeous Spade Picket Fence and wrapped it all the way around. I first painted it with gesso, then stamped it with a flourish stamp and frayed burlap distress ink. After that I sprayed it with a few Shimmerz mists in pink tones. For the Vine Flourish going up the post sign i just inked it with frayed burlap and covered with gesso, then added some pearl dots to the ends of it.
Products Used
And now I have a layout to share. Layouts have always been my weakness, I'm much more of an altered art type of gal. But I have been really enjoying making layouts lately. I had to capture this day at the beach with our doggy "Jolene" I used the Basecoat range and really went to town with the mediums. Lots of stamping, spraying, stenciling, smearing etc Lol.
For the Corner Piece and the Fern Piece to the left i gessoed them sparingly, just dabbing my sponge onto them. Then I added some glue in a few places and adhered some mircobeads. I love this effect. The gorgeous Heart PIece (Lou's chippies rock) was colored with worn jeans Prima chalk edger.
The GORGEOUS Monarch Butterfly (did i mention gorgeous???) I treated with a 3 tone effect, the top is a blue (prima worn jean chalk edger), the middle part is a smokey color (frayed burlap distress ink), and the bottom is white from gesso.
Now i LOVED working with these cool Branch And Leaves Spray. i used the large one and the small one. I took turns dabbing them with gesso, gold rub and buff, and worn jean chalk edger. I did this over and over until i really built up the color and depth on the pieces. The photo doesn't do justice to how pretty they look.
I always like to print my pictures out on transparency. I just love the effect of paper showing through.
You can really see the micro beads on this chippie.


Both projects are wonderful! That flower pot is incredible! You certainly put a lot of work into that! Beautiful!
ReplyDeleteThe layout is Gorgeous! Love the twisted ribbon and all the chippies!
Your talent for layering is tremendous! Lovely, lovely, lovely!!!
Love love love all your hard work Miranda! Both projects are amazing!!!
ReplyDeleteBeautiful projects, I just love all the detail in your work, you're amazing my friend!!!!
ReplyDeleteI just love that gorgeous bouquet of medaillon flowers - so very pretty! Your lay-out looks completely awesome too. Wonderful work with the chippies!
ReplyDeletealways a joy to see your work Miranda, and these these two gorgeous projects are no exception!!! you did an awesome job...LOVE them both!! xxx
ReplyDeleteWhat absolutely STUNNING projects - WOW
ReplyDeleteTracy (Crafty Emblies DT member)
x
Both such uniquely different projects!!! Love them both Miranda...just Wow!!!
ReplyDeleteWow!!!!! Stunning work on both projects. The garden pots is simply amazing....wow, takes my breath away! Thanks for sharing Miranda!!!!!
ReplyDeleteGorgeous creations Miranda!!
ReplyDeletewow fantastic
ReplyDeleteBeautiful work....love both projects...really like your styling! ;-)
ReplyDelete