

This year so far I seem to be in a bug phase, at the
beginning of the year I found a silver cicada ring,(which
I bought) and I loved it so much I looked for
a plastic one to craft with.
I found lots of tubes and packets with assorted
plastic bugs which inspired me to this framed
specimen board.
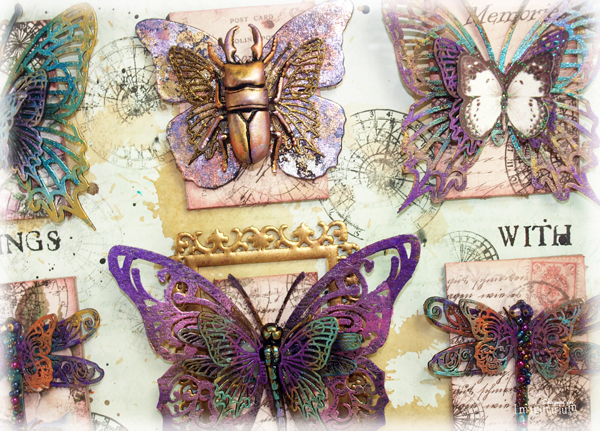
I have layered Imaginarium chipboard butterflies with
dragonfly's and solid butterflies.
to create a mythical layered flying machine.

I have then topped it with a painted bug.
With a wide selection to choose from in
the bag of bugs, I have chosen here a dragon fly.

Each panel is different.
To achieve the pearlescent look, I
have sprayed the chipboard with
matt black spray paint and allowed it to dry.

Then I have layered over metallic gold paint, and
assorted colours of metallic Inka gold.
I have also use some of the Stemple farbe for
a glittery look to some of the wings.
You can mix contrasting colours for a really
neat look that pops.

This little creature is a chipboard butterfly that
I have added Mega Flakes to, you can
just follow the instructions below to
create a gorgeous opal look like this.

I tried a plain black frame first and while
it was ok, the white frame above looked so
much better.

Step 1
Paint chipboard butterfly black with
Matt black spray paint and
allow to dry.

Step 2
Rub over flitter glue,this is a sticky size
that will dry tacky and help
the gilding flakes adhere.
You can fudge this with ordinary glue,
but the flitter glue is better.

Step 3
Level the glue out with your fingers, so it will
dry evenly.

Step 4
Place Mega flakes randomly over top of glue, when it
is dry.

Step 5
Tap down the flakes so that they
cover most of the black chipboard.

Step 6
Then use a scouch pad, (plastic scourer)
to remove excess gold flake,to reveal
the gilded wings below.

Step 7
I have added a little purple inka gold
to the edges of the wings to
Match with the other
creatures I have made

Step 8
Cover surface with a thin coat of dimensional magic
to seal the surface and give a wonderful shine.

Here are some close ups of each creature I have made

The larger middle butterfly sits in a gilded frame.
This, I have gold embossed twice for a lustrous effect.

The dragon fly has black opal seed beads
adhered to his body for dimension.
I have used Dimensional magic to
affix the beads as it dries glossy and clear.

I have added in some metal charms too, for
smaller and shiny layers.

Each creature sits on a chipboard panel
I have created with Magnolia Lane papers and stamps.

This butterfly has a Magnolia Lane die cut
in the middle for a touch of realism

Each bug is sprayed with matt black spray paint
too. And when dry rub over gold metallic paint first,
as a base.
Allow to dry and then dab or blend
contrasting colours of inka gold.
It picks up all of the texture.

Dont forget to decorate the centres, I have used a rhinestone
and silver bugle bead here.
Chipboard used


Wishing Well Address book

This practical little book is made from
a purchased address book from a supermarket.

This project is a little more simpler than the last
but still pretty.

I have used texture paste, lace and braid to
alter the surface of the book.
Then added trinkets, chipboard and resin shapes in a
cluster to decorate my cover.
Everything gets painted with gesso and painted
with Calypso Teal Dylusions paint.

I have double embossed the frame, and while
hot, spray with Calypso teal Dylusions, continue
to heat for a second or two and then allow to cool.
this gives a wonderful antiqued look.

When you are happy with your book, rub over
copper and turquoise inka gold for
a burnished patina.
Imaginarium Chipboard Used

Happy Crafting


