
Canvas, Letters and a
Chronograph
by Sue Smyth
Chronograph
by Sue Smyth

I have been inspired lately by books and movies, so my
next few projects have taken a theme and made it my own.
The first one is the Cursed Child, the new Harry Potter book.
I loved the image of the nest with wings and a child nestled
inside. See the bottom of this post for a tutorial.

I have made a nest from lots of thin strips of cardstock. And
tucked green moss and feathers inside.
I think any self respecting bird would love this nest dont you ? lol.
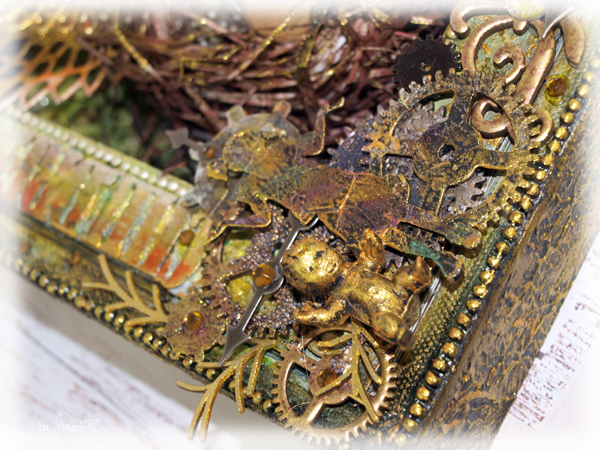
In the corner there is a little plastic baby, which I have spray
painted black and then rubbed over with gold paint.

Lots of cogs and metal trinkets layer over each other
give a steampunk look to the canvas.

I have added some stryo foam eggs too.

The gorgeous wings, have been dry brushed with gesso and
sprayed with orange dylusions and colour bursts.

I wanted the letters to blend in with the canvas, but to
have a ombre look too.

The pearl strips, when painted look just like a dotted line
turning into texture instead of shine and bling.

I have tucked in some snipped up fine leaves, to soften
the look of the cogs.

A lovely 3 D layered butterfly, see a tutorial below to
find out how they are made.

Here is a nice close up of the letters, layers of
colour makes them look so interesting.

A close up showing the layering of cogs, mix chipboard
ones with real metal ones to extend the metallic look.

And here we see the wings protruding out of the canvas
don't be afraid to work outside the boundaries.
A Chronograph folly

Well if you have seen Alice through the looking glass
you will know the Chronograph is the device
which Time, and later Alice travels through dimensions.

I found a small pool ball in a junk shop for a few cents.
And for some odd reason thought that would come in handy.
Later I decided to make my version of the Chronograph.

This project is hard to photograph because it
has so many layers. But here you can see
inside the pool ball, it is the blue part.

I have adhered the tiny cogs to the surface of the
pool ball, with gel medium and painted it with black gesso.
Then rub over with inka gold
turquoise, blue, graphite and purple
for a metallic sheen

Then I have used the large cog set, which I have
spray painted black. The I have snipped them up to
make the circular layers around the
pool ball.

I have added 2mm rhinestones along the cogs
edges this not only gives detail and texture, but
as I have glued them with extra glue, it also
gives the chip cogs strength.

Two trinkets either side, give more detail. I have
actually cut the centres out of the trinket.

Then I have added a gorgeous antiqued clock cabochon
to re enforce the time theme.
So what I have ended up with is a bit
of nonsense really lol. But I like it's tactile
appearance, besides it is only small and takes
up so little room.!
Monograph Letters

Next is a project I did for the June show here in Brisbane.
I had purchased the letters for my first name, sometime
ago, and this year I found the letters for my surname.

So I decided to do them up as a sign for the
class room, to go above my work.
I dont think anyone would miss seeing them lol.

These letters were already black, I so arranged and glued
Imaginarium chipboard and trinkets on to the letters.

Then paint with black gesso, and rub over with inka gold,
turquoise, purple, blue and lastly gold.

Then add pearls and rhinestones for highlights

Here is a tutorial in pictures to make the
Natural Born Children Canvas above.

I have started with a square canvas, and
using the reverse side, adhere Imaginarium
chipboard corners with gel medium.

Add pearls around the edges and alphabet chip, as desired.
I have trimmed bubble wrap and adhered to the centre
with gel medium.

Then paint with white gesso, dry with a heat gun, but
be careful with the bubble wrap as it will burn and shrink.

I have added texture paste to the edges of the canvas
use a palette knife, with a stipple motion
for great texture.

Next emboss, cogs and children, with aged gold embossing powder
this is kind of a Utee so will give lumpy bumpy look.
Dont be too perfect with some, leaving gaps and exposed chipboard.
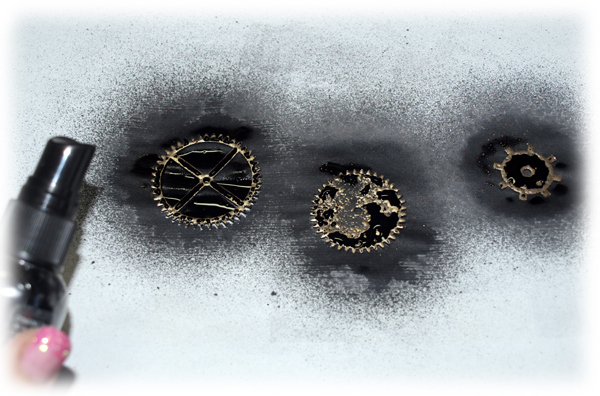
Then spray with Black dylusions and wipe off
excess, to create a wonderful aged look to your
cogs.


Some other pieces of chipboard, are double embossed
to give a lush thick look.

Then I have added mini Art stones to the embossing
powder while it was hot.

Then spray with Black dylusions to colour the
art stones for a great crusted look.

Now paint the chip children with black gesso.

Use a crackle stamp (rollergraph here) over
top of the wet gesso to create texture. Then dry off.


Rub over with gold paint, which will now pick up
the crackle texture.

Back to our canvas, spray the edges with
black dyluisons.

Then the centre with yellow dylusions, blending
in the edges.

Dry, and add Colour bursts, which are actived
by a spritz of water, be careful and
dry after each addition.

Rub, gold paint and shimmer paint over top of canvas.

Keep adding layers of colours.

Here is the nest, lots of strips of white cardstock, are
dampened with water and twisted into a nest shape.
Then spray with Brown dylusions.
Dont forget to flick over gold and brown sprays.

Tuck in some green moss, along with feathers.

Dry brush wings with gesso, then spray with orange
dylusions and rub over with gold paint.

Now start to assemble, adhering each layer as you go.

Here I have painted branches and butterflies with
a gold shimmer paints

The base butterflies, are spray painted with black
spray paint.

Cover with Dimensional Magic

Then layer over the gold butterflies, and allow to dry.
I hope you are inspired by some of the techniques here
or even to tackle your own canvas.
Chipboard used


Happy Crafting

Your talent shows in your work Sue all of these are exquisite pieces of art, love all the chipboard adds lots of dimension and texture.
ReplyDeleteI am absolutely in love with all of these OUT OF THIS WORLD AMAZING creations! So many wonderful details and I can't stop looking at them!! TFS!
ReplyDeleteGorgeous work and
ReplyDeletetechniques. Awesome
to look at.
Carla from Utah
Beautiful projects and breakout photos Sue, not sure what is my favourite .... just love them all!
ReplyDelete